Classic Cast Iron Fried Chicken (Easy Brine Recipe)
Classic Cast Iron Fried Chicken (Easy Brine Recipe)
The Secret to Perfect Old-Fashioned Fried Chicken
Sometimes the best meals are the ones that take us back to the basics. If it has been years since you last fried chicken at home, this recipe is the perfect way to dust off your skills. This classic cast iron fried chicken relies on traditional, no-fuss methods to deliver incredibly juicy meat surrounded by a deeply flavorful, crispy crust.
The secret to this foolproof recipe lies in a two-step flavor building process. First, the chicken takes a bath in a simple wet brine loaded with pantry staples like garlic powder, onion powder, and paprika. This not only injects savory flavor right down to the bone but also tenderizes the meat. Second, instead of a complicated egg wash station, the wet chicken goes straight from the brine into a flour mixture seasoned with the exact same spices.
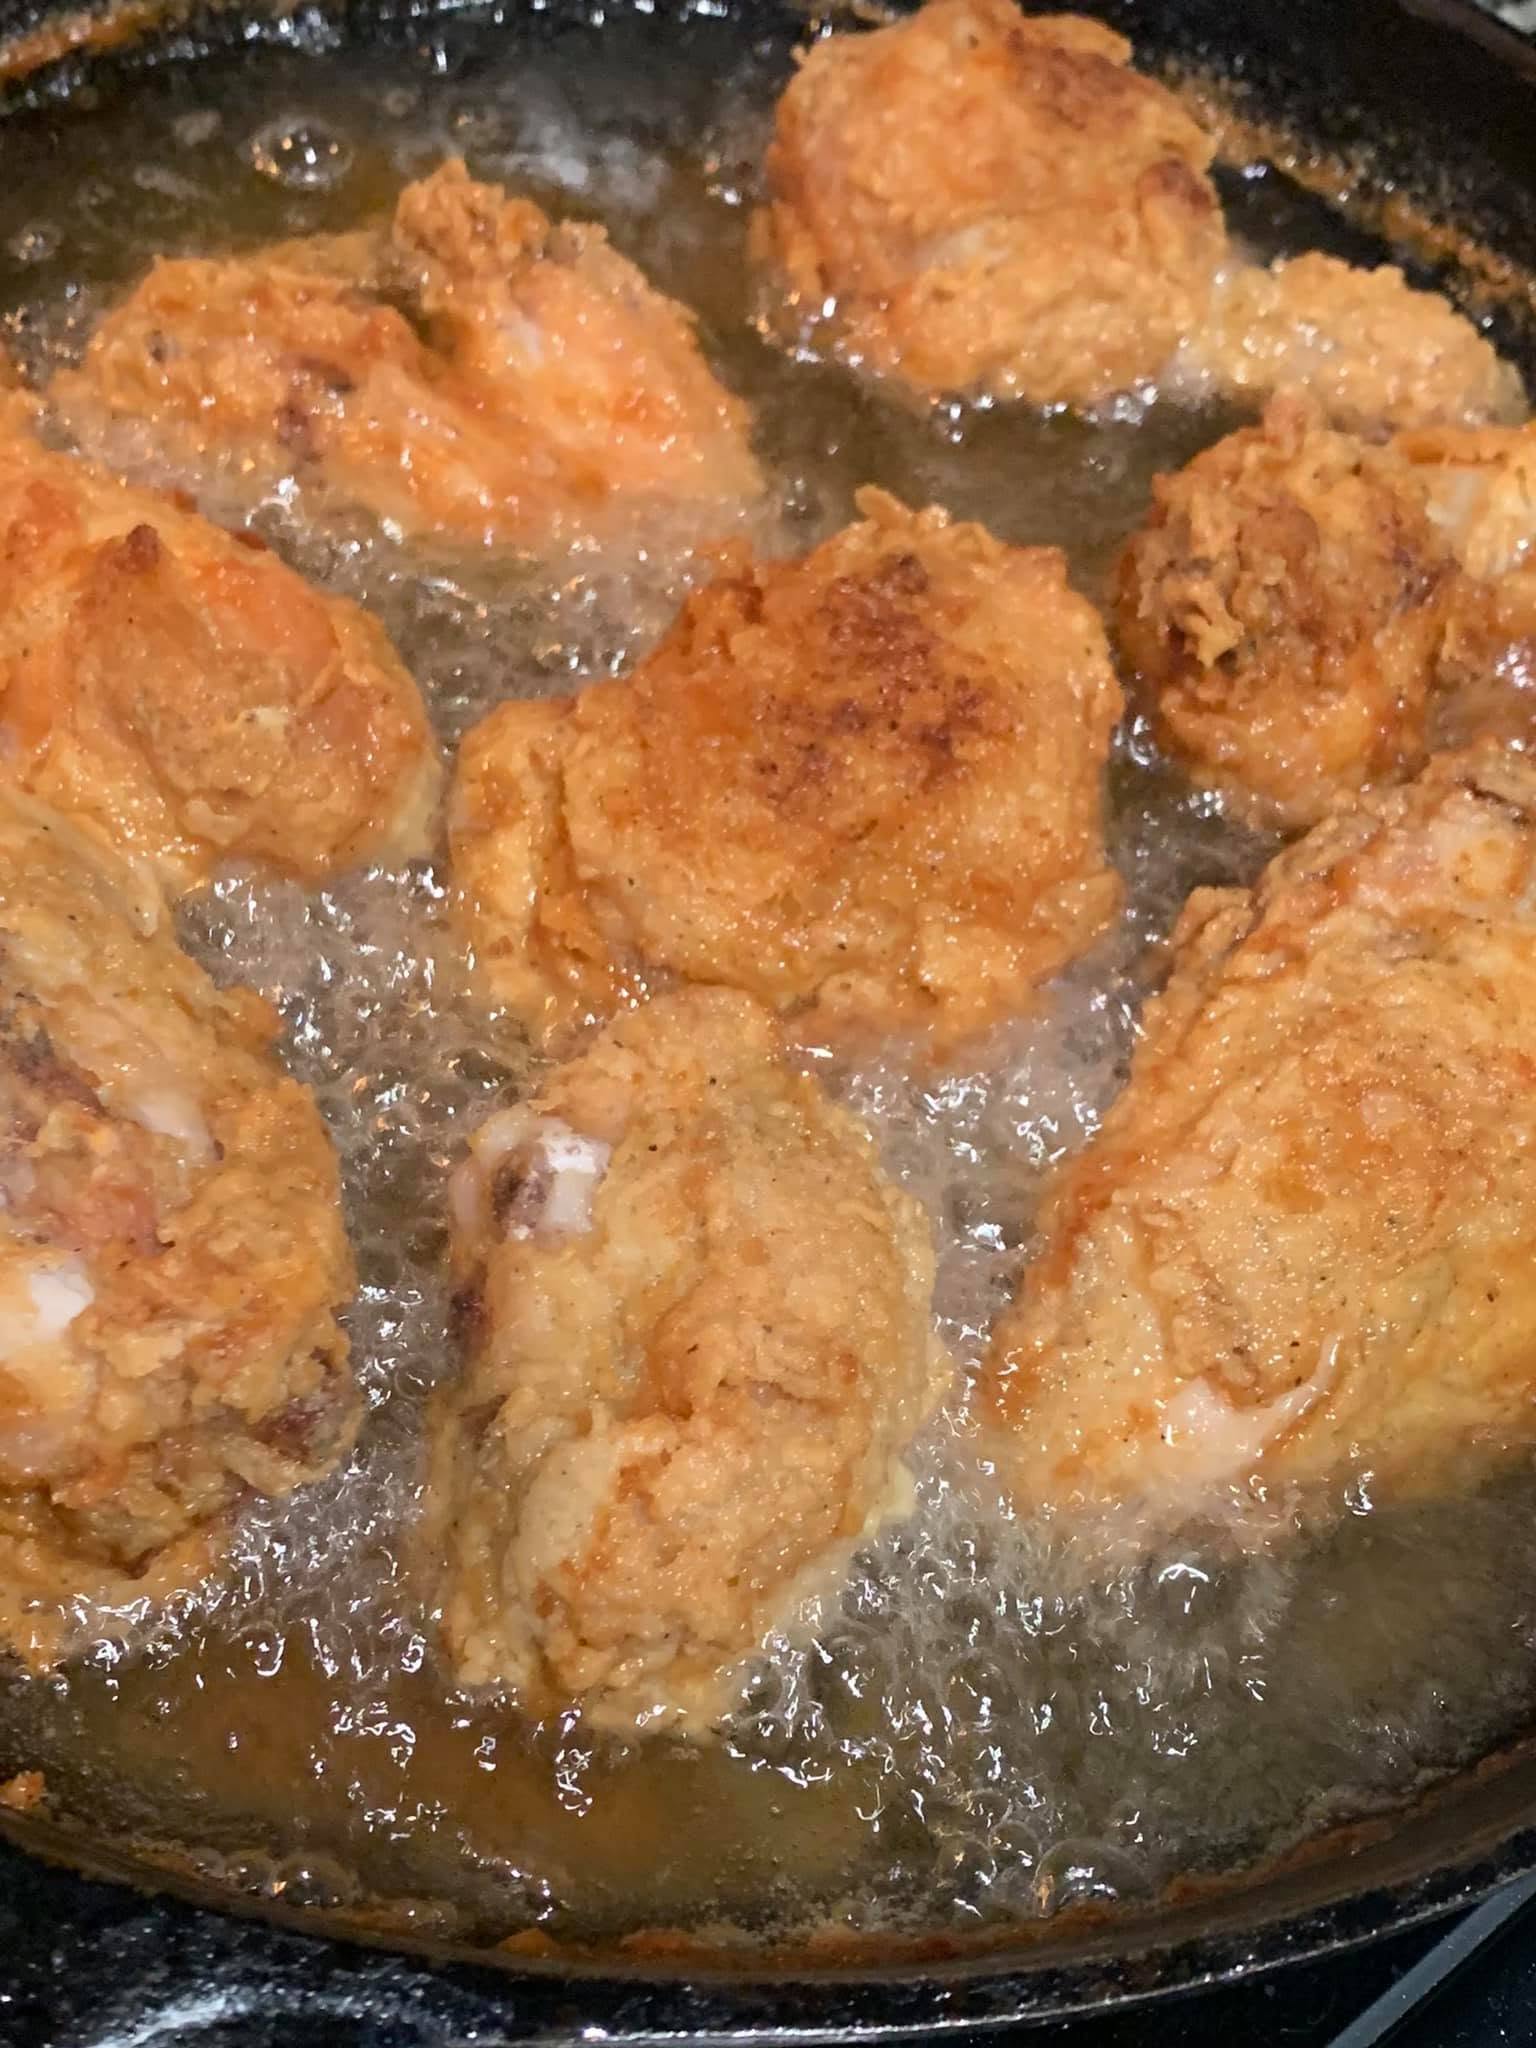
Frying in shortening inside a heavy skillet is the final key to success. Covering the pan while frying locks in the steam, ensuring the thickest pieces cook all the way through without burning the crust. The result is a gorgeous, golden-brown crust that rivals any restaurant or fast-food joint, made entirely from scratch in your own kitchen.
Why You’ll Love This Recipe
-
Simple Ingredients: You only need basic all-purpose flour, water, shortening, and a handful of common pantry spices to make this happen.
-
Double the Flavor: By using the exact same spice blend in both the wet brine and the dry flour dredge, the flavor profile is remarkably consistent and robust.
-
Foolproof Coating: Moving the chicken directly from the brine to the flour helps the seasoned coating cling perfectly to the skin, preventing it from sliding off in the pan.
-
Juicy Interior: The combination of a wet brine and the covered cooking technique guarantees that the chicken remains moist and tender, never dry.
-
Nostalgic Appeal: Frying in shortening brings back that authentic, vintage taste and texture that modern cooking oils often miss.
Ingredients
-
Chicken: 1 whole chicken (cut into 8 pieces), or about 3-4 pounds of your favorite bone-in, skin-on chicken pieces (thighs, drumsticks, and breasts).
-
Frying Fat: Crisco or your preferred solid shortening (enough to fill your skillet about halfway up the chicken pieces).
-
All-Purpose Flour: 2 cups, for the dredging station.
-
Water: 2 cups, for the wet brine.
-
Salt: 2 tablespoons total (1 tablespoon for the brine, 1 tablespoon for the flour).
-
Black Pepper: 2 tablespoons total (1 tablespoon for the brine, 1 tablespoon for the flour).
-
Garlic Powder: 2 tablespoons total (1 tablespoon for the brine, 1 tablespoon for the flour).
-
Onion Powder: 2 tablespoons total (1 tablespoon for the brine, 1 tablespoon for the flour).
-
Paprika: 2 tablespoons total (1 tablespoon for the brine, 1 tablespoon for the flour).
Step-by-Step Instructions
Step 1: Prepare the Savory Brine
In a large mixing bowl or a deep container, combine 2 cups of cold water with 1 tablespoon each of salt, black pepper, garlic powder, onion powder, and paprika. Whisk the mixture well until the salt dissolves. Submerge your chicken pieces completely in the liquid. Cover the bowl and refrigerate for at least one hour to allow the flavors to penetrate the meat.
Step 2: Mix the Seasoned Flour
While the chicken is brining, prepare your dredging station. In a wide, shallow dish (like a pie plate or a large baking dish), add the 2 cups of all-purpose flour. Whisk in the remaining spices: 1 tablespoon each of salt, black pepper, garlic powder, onion powder, and paprika. Ensure the spices are evenly distributed throughout the flour.
Step 3: Heat the Shortening
Place a large, heavy skillet on the stove over medium heat. Add enough Crisco or shortening to fill the pan about an inch deep, or enough to come halfway up the sides of your chicken pieces. You want the fat hot enough that a pinch of flour dropped into the pan immediately aggressively sizzles.
Step 4: Dredge the Chicken
Remove a piece of chicken from the wet brine, allowing just the excess liquid to drip off for a second. Do not dry the chicken! Place the wet chicken directly into the seasoned flour. Toss it thoroughly to coat all sides, pressing the flour into the skin so it adheres well. Shake off any loose flour and carefully place the chicken into the hot shortening. Repeat until the pan is full, but avoid overcrowding.
Step 5: Fry Covered
Once the chicken is in the pan and sizzling loudly, place a tight-fitting lid on the skillet. Allow the chicken to fry covered. This traps the heat and steam, cooking the chicken through to the bone. Fry for about 20 minutes on the first side, then carefully remove the lid (watch out for condensation dripping into the hot fat) and flip the pieces.
Step 6: Finish and Drain
Cover the pan again and cook for another 15 to 20 minutes on the second side. The total cooking time should be roughly 40 minutes, depending on the size of the pieces. The crust should be a deep, beautiful golden brown. Remove the chicken from the skillet and place it on a wire cooling rack set over a baking sheet to drain the excess fat and keep the bottom crust crispy.
Expert Cooking Tips
-
The Cast Iron Advantage: Using a heavy cast-iron skillet is highly recommended for this recipe. Cast iron retains heat beautifully, meaning the temperature of your shortening will not drop drastically when you add the cold, raw chicken to the pan.
-
Listen to the Sizzle: If you do not have a frying thermometer to check the grease temperature, use your ears. The chicken should sizzle vigorously the moment it hits the fat. If it just sits there, the shortening is too cold, and your chicken will become greasy.
-
Watch the Lid: When removing the lid to check or flip the chicken, lift it straight up and angle it away from the pan. You want to avoid letting any pooled condensation on the underside of the lid drip back into the hot shortening, which causes dangerous splattering.
-
Rest Before Serving: Letting the fried chicken rest on a wire rack for at least 10 minutes before eating allows the juices inside the meat to redistribute, ensuring every bite is perfectly moist.
Variations to Try
-
Spicy Kick: Add a teaspoon of cayenne pepper to both the wet brine and the seasoned flour mixture for a subtle, lingering heat.
-
Buttermilk Brine: If you prefer a slightly tangier flavor profile, substitute the 2 cups of water in the brine with 2 cups of whole buttermilk, keeping the spice measurements exactly the same.
-
Herb Roasted Flour: Mix a teaspoon of dried thyme and dried oregano into the flour dredge for a more complex, herbaceous crust.
What to Serve With Cast Iron Fried Chicken
Fried chicken demands classic, hearty side dishes. Serve these golden brown pieces alongside a large bowl of creamy garlic mashed potatoes and rich brown gravy. Sweet, buttery corn on the cob and a tangy, crisp cabbage coleslaw offer a refreshing contrast to the savory crust. Don’t forget a basket of warm buttermilk biscuits to soak up every last bit of flavor on the plate.
Storage & Reheating
Refrigerator
Store leftover fried chicken in an airtight container in the refrigerator for up to 4 days. Allow the chicken to cool completely on a wire rack before packing it away to prevent condensation from turning the crust to mush.
Freezer
You can freeze cooked fried chicken for up to 3 months. Wrap each piece individually in aluminum foil, then place them all into a heavy-duty freezer bag. Thaw overnight in the refrigerator before reheating.
Reheating
To bring back the crispy texture, never use the microwave. Instead, preheat your oven to 400°F (200°C). Place the leftover chicken on a wire rack set over a baking sheet and bake for 15 to 20 minutes, or until the skin is re-crisped and the meat is heated all the way through.
Frequently Asked Questions
Why do you cover the pan when frying chicken?
Covering the skillet traps the heat and moisture, essentially creating a mini-oven. This steams the chicken slightly as it fries, ensuring the thickest parts of the meat cook completely through without the outside crust burning.
Do I have to use shortening like Crisco?
While shortening provides a very traditional flavor and a uniquely crisp texture, you do not have to use it. You can substitute it with peanut oil, vegetable oil, or canola oil, all of which have high smoke points suitable for frying.
How do I know when the chicken is fully cooked?
The most reliable way to check for doneness is using a digital meat thermometer. The thickest part of the chicken (like the center of a breast or thigh, not touching the bone) should register at least 165°F (74°C). The juices should also run clear when the meat is pierced.
Why is my fried chicken crust falling off?
The crust usually falls off if the chicken was not dredged properly or if the frying fat was too cold. Moving the chicken directly from the wet brine to the flour creates a sticky paste that adheres well. Also, make sure not to fiddle with or turn the chicken too much while it fries; let the crust set firmly before flipping.
Can I brine the chicken overnight?
Yes, you can leave the chicken in the wet brine overnight for maximum flavor penetration. However, do not leave it for longer than 24 hours, or the texture of the meat may begin to break down and become mushy.
Final Thoughts
Making fried chicken at home does not have to be an intimidating process requiring a deep fryer and complicated dredging stations. By relying on a simple, heavily seasoned wet brine, a matching flour coating, and the gentle, even heat of a covered skillet, you can easily achieve spectacular results. This classic cast iron fried chicken is a testament to traditional cooking—crispy, juicy, and incredibly satisfying. Get your skillet hot and enjoy bringing this comfort food classic to your dinner table!
Classic Cast Iron Fried Chicken
A foolproof, vintage recipe for incredibly crispy and juicy fried chicken using a simple wet brine, seasoned flour, and shortening.
Ingredients
Equipment
Method
- Brine the Chicken: In a large bowl, whisk together 2 cups of water with 1 tbsp each of salt, pepper, garlic powder, onion powder, and paprika. Submerge the chicken pieces, cover, and refrigerate for at least 1 hour.
- Prep the Flour: In a wide, shallow dish, whisk together the 2 cups of flour with the remaining 1 tbsp each of salt, pepper, garlic powder, onion powder, and paprika.
- Heat the Fat: Heat enough shortening in a large cast-iron skillet over medium heat to come halfway up the sides of the chicken. The fat is ready when a pinch of flour sizzles aggressively.
- Dredge: Remove a piece of chicken from the wet brine (do not dry it) and place it directly into the seasoned flour. Toss to coat completely, pressing the flour into the skin. Shake off excess.
- Fry Covered: Carefully place the coated chicken into the hot skillet. Once all pieces are in and sizzling, cover the pan with a tight-fitting lid. Fry for about 20 minutes on the first side.
- Flip and Finish: Carefully remove the lid (avoiding dripping water into the fat). Flip the chicken pieces over. Cover again and fry for another 15-20 minutes until deeply golden brown and cooked through (internal temp 165°F).
- Drain: Remove the chicken from the skillet and let rest on a wire rack to drain excess fat before serving.
Notes
Safety: Always lift the skillet lid away from you to prevent hot steam or water droplets from causing the grease to splatter.
Temperature: If the crust is browning too quickly before the center is cooked, lower your stove temperature slightly.