Best Crispy Cheesy Cast Iron Pan Pizza (King Arthur Recipe)
Best Crispy Cheesy Cast Iron Pan Pizza
The Ultimate 80s Nostalgia Pizza
If you have been looking for an excuse to expand your cast iron collection, this is it. There is a very specific, deeply nostalgic joy associated with the thick, airy, crispy-edged pan pizzas from the 1980s—back when dine-in pizza parlors reigned supreme. This King Arthur Baking recipe flawlessly recreates that legendary texture and flavor right in your home kitchen.
The secret to this phenomenal pizza is a combination of a slow-fermented, high-hydration dough and the unmatched heat retention of a heavy cast iron skillet. The olive oil in the bottom of the pan essentially shallow-fries the bottom and sides of the dough as it bakes, creating a sturdy, golden-brown crust that shatters audibly when you bite into it.
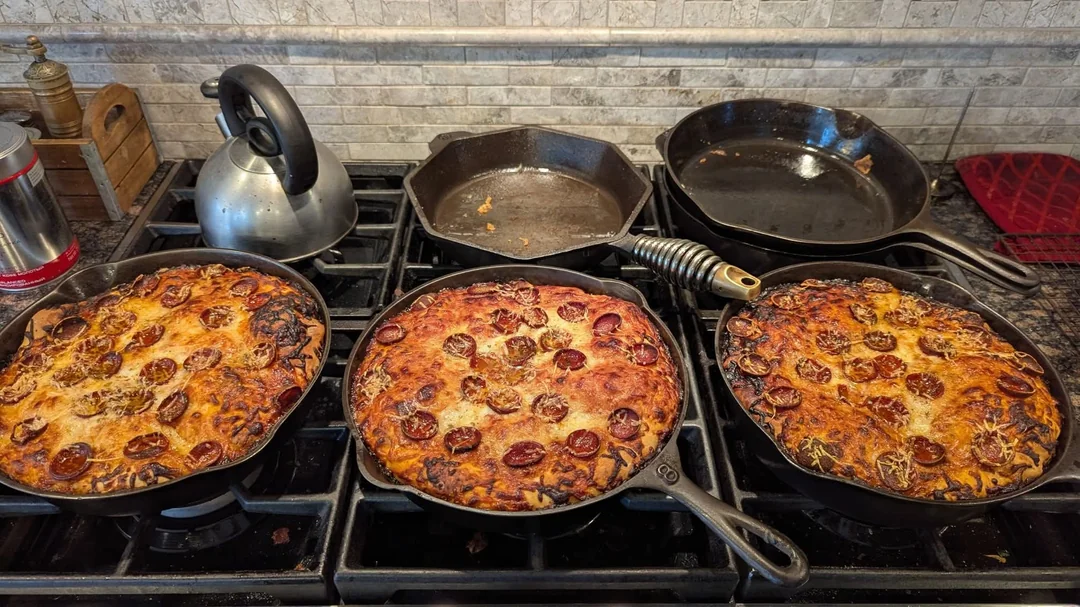
Meanwhile, laying down the cheese before the sauce prevents the dough from getting soggy, and pushing the cheese all the way to the edges of the pan results in that coveted, dark, caramelized cheese halo. Whether you are baking a single pie for yourself or firing up multiple skillets to feed a crowd, this foolproof recipe will ruin delivery pizza for you forever.
Why You’ll Love This Recipe
-
Unbeatable Texture: The crust is incredibly light and pillowy on the inside, yet shatteringly crisp on the bottom and edges.
-
Caramelized Cheese Halo: Pushing the mozzarella completely to the edges of the hot cast iron creates a crispy, caramelized border that is arguably the best part of the pizza.
-
Flexible Schedule: The dough requires a long, slow rise in the refrigerator (anywhere from 12 to 72 hours), meaning you can prep it days in advance and bake it whenever you are ready.
-
No Kneading Required: A simple series of gentle folds replaces traditional, labor-intensive kneading.
-
Soggy-Proof: Layering the cheese underneath the sauce acts as a protective barrier, keeping the crust perfectly crisp.
Ingredients
The Crust
-
Flour: 2 cups (240g) King Arthur Unbleached All-Purpose Flour.
-
Salt: 3/4 teaspoon table salt.
-
Yeast: 1/2 teaspoon instant yeast or active dry yeast.
-
Water: 3/4 cup (170g) lukewarm water.
-
Olive Oil: 1 tablespoon (13g) for the dough, plus 1 1/2 tablespoons (18g) to heavily grease the pan.
The Topping
-
Mozzarella Cheese: 6 ounces (170g), freshly grated (about 1 1/4 cups, loosely packed).
-
Pizza Sauce: 1/3 to 1/2 cup (74g to 113g) of your favorite homemade or store-bought tomato sauce.
-
Optional Garnishes: Freshly grated hard cheese (Parmesan, Asiago, Romano) and fresh herbs (oregano, basil, thyme).
-
Pepperoni (Optional): Highly recommended for that classic parlor-style finish!
Step-by-Step Instructions
Step 1: Mix the Dough
Weigh your flour, or measure it by gently spooning it into a cup and sweeping off the excess. In a medium-large mixing bowl (or a stand mixer), combine the flour, salt, yeast, lukewarm water, and 1 tablespoon (13g) of olive oil. Stir everything together until it forms a shaggy, sticky mass with no dry patches of flour. This takes about 1 minute by hand or 30 to 45 seconds using a paddle attachment. Scrape down the sides and cover the bowl.
Step 2: Fold, Don’t Knead
Let the dough rest for 5 minutes. Uncover the bowl, wet your hand, and reach down between the side of the bowl and the dough. Stretch the bottom of the dough up and over its top. Repeat this three more times, turning the bowl 90° each time. This is one “fold.”
Re-cover the bowl and wait 5 minutes. Repeat this folding process three more times, with a 5-minute rest between each set (for a total of four folds).
Step 3: The Cold Ferment
Cover the bowl tightly and let the dough rest, undisturbed, at room temperature for 40 minutes. Transfer the bowl to the refrigerator for a minimum of 12 hours (or up to 72 hours). The slow chill develops an incredible, complex flavor.
Step 4: Prep the Cast Iron
About 3 hours before you plan to eat, prepare your 10-inch cast iron skillet. Pour 1 1/2 tablespoons (18g) of olive oil into the pan. Tilt it to spread the oil across the bottom, and use your fingers to grease the sides of the pan as well.
Step 5: Shape and Rise
Transfer the cold dough to the skillet and turn it once to coat both sides in oil. Use your fingertips to gently press and dimple the dough toward the edges of the pan. If the dough resists and shrinks back, cover it, let it rest for 15 minutes, and try again until it reaches the edges.
Cover the pan and let the crust rise at room temperature for 2 hours until it looks soft, pillowy, and jiggles slightly when you shake the pan.
Step 6: Layer the Toppings
About 30 minutes before baking, preheat your oven to 450°F (230°C). Place one rack at the very bottom and one toward the top (4 to 5 inches from the heating element).
Sprinkle three-quarters of the mozzarella evenly over the fully risen crust, ensuring no bare dough is showing around the edges (this creates the caramelized crust!). Dollop small spoonfuls of the sauce over the cheese, then sprinkle the remaining mozzarella and any other desired toppings (like pepperoni) over the top.
Step 7: Bake and Cool
Bake on the bottom rack for 18 to 20 minutes, until the cheese is bubbling and the bottom crust is a rich golden brown (lift it slightly with a spatula to check). If the top needs more color, move it to the top rack for 2 to 4 minutes.
Remove the skillet from the oven. Carefully run a spatula or knife around the edge to loosen the caramelized cheese. Transfer the pizza to a wire cooling rack immediately to prevent the bottom from getting soggy.
Expert Cooking Tips
-
Avoid Wet Toppings: If you are adding vegetables (like mushrooms or bell peppers) or meats (like sausage), make sure they are pre-cooked and drained well before placing them on the pizza to avoid a soggy crust.
-
Sauce Placement is Key: Dolloping the sauce over the initial layer of cheese is the ultimate trick to pan pizza. It prevents the moisture of the tomatoes from seeping into the dough as it bakes.
-
Cutting the Pizza: Do not cut the pizza while it is still in your cast iron skillet, as a pizza wheel or knife can severely damage your seasoning. Move it to a cutting board, or use heavy-duty kitchen shears to cut it into wedges.
-
Alternative Pans: If you don’t have cast iron, a 10-inch round cake pan or a 9-inch square, heavy-bottomed metal baking pan will also work wonderfully.
Variations to Try
-
White Garlic Pan Pizza: Swap the tomato sauce for a creamy garlic alfredo or ricotta base, and top with roasted garlic cloves and fresh spinach.
-
Pesto and Chicken: Use a dollop of fresh basil pesto instead of red sauce, and top with grilled chicken strips and cherry tomatoes.
-
Gluten-Free: King Arthur offers a phenomenal gluten-free pan pizza recipe that mirrors this technique using their specialized measure-for-measure flour blends.
What to Serve With Cast Iron Pan Pizza
A pizza this thick, rich, and decadent demands a light, acidic side dish to cut through the heavy cheese and carbs. Serve it alongside a massive Italian house salad tossed with a sharp, tangy vinaigrette, pepperoncinis, and red onions.
If you are hosting a classic pizza night, pair it with crispy baked chicken wings, garlic knots, and an ice-cold pitcher of beer or your favorite vintage soda.
Storage & Reheating
Refrigerator
Allow any leftover slices to cool completely on a wire rack. Store them in an airtight container or zip-top bag in the refrigerator for up to 4 days.
Freezer
You can freeze baked slices tightly wrapped in plastic wrap and aluminum foil for up to 2 months.
Crispy Cheesy Cast Iron Pan Pizza
A wildly delicious, thick-crust pan pizza baked in a cast iron skillet. Features a crispy, fried bottom and a perfectly caramelized cheese edge.
Ingredients
Equipment
Method
- Mix the flour, salt, yeast, water, and 1 tbsp olive oil in a bowl until a sticky dough forms.
- Rest for 5 minutes. Perform a set of 4 folds (stretch the dough over itself 4 times). Repeat this folding process 3 more times, resting 5 minutes between each set.
- Cover and rest for 40 minutes at room temperature, then refrigerate for 12 to 72 hours.
- Pour 1.5 tbsp olive oil into a 10-inch cast iron skillet, coating the bottom and sides.
- Place the dough in the pan, coat in oil, and press toward the edges. (Rest 15 mins and repeat if the dough shrinks back).
- Cover and let rise at room temperature for 2 hours until pillowy.
- Preheat oven to 450°F (230°C).
- Sprinkle 3/4 of the mozzarella completely to the edges of the dough. Dollop sauce over the cheese, then top with remaining cheese and desired toppings.
- Bake on the bottom rack for 18-20 minutes until the edges are dark and caramelized.
- Run a knife around the edge, remove the pizza to a cooling rack immediately, slice, and serve.
Notes
Scaling: Double the ingredients perfectly to make two 10-inch pizzas in separate skillets.
Cheese Barrier: Always place the primary layer of cheese directly on the raw dough to prevent the sauce from making the crust soggy.