Homemade Pumpkin Hand Pies (Vintage Glazed Recipe)
Homemade Pumpkin Hand Pies (Vintage Glazed Recipe)
Recreate a Nostalgic Childhood Classic
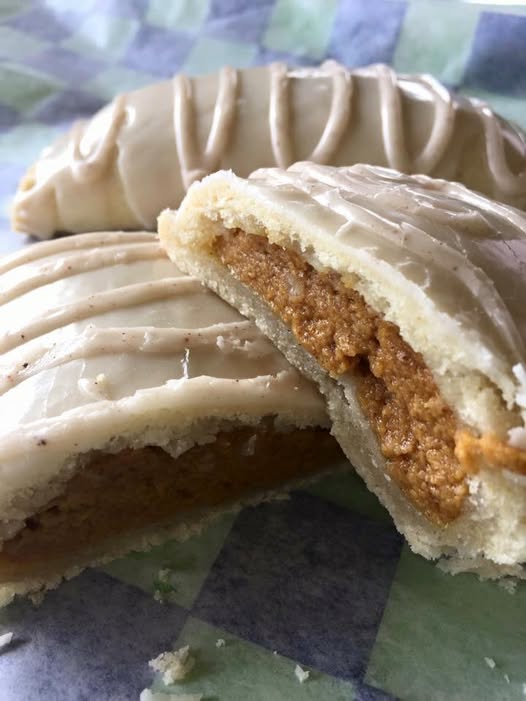
There is something deeply comforting about vintage, grab-and-go treats from childhood. While store-bought, cellophane-wrapped hand pies were once a lunchbox staple, creating them from scratch in your own kitchen yields a dessert that is infinitely better. These homemade pumpkin hand pies capture that nostalgic magic with a perfectly flaky crust, a rich, spiced filling, and a beautiful bakery-style glaze.
Finding pumpkin-flavored hand pies in stores is notoriously difficult, making this the perfect recipe to master at home. This method takes all the frustration out of working with wet pumpkin filling by utilizing a brilliant pre-baking trick that transforms the filling into easy-to-scoop portions.
Whether you are baking for a crisp autumn gathering, looking for a unique Thanksgiving dessert alternative, or simply craving a sweet throwback treat with your morning coffee, these hand pies deliver. Best of all, this recipe utilizes clever shortcuts—like using a tortilla press to flatten the dough—meaning you can enjoy bakery-quality results without turning your kitchen into a complete disaster zone.
Why You’ll Love This Recipe
-
Nostalgic Appeal: Captures the classic taste and texture of vintage store-bought hand pies, but with fresh, high-quality ingredients.
-
The Ultimate Filling Hack: Pre-baking the pumpkin filling on a cookie sheet prevents soggy crusts and makes assembly a breeze.
-
Clever Prep Shortcuts: Utilizing a tortilla press to flatten the dough portions saves time and ensures perfectly even crusts without a rolling pin.
-
Customizable Crust: You can use your absolute favorite homemade pie crust recipe or opt for a high-quality store-bought dough to save time.
-
Perfectly Portioned: Each hand pie is an ideal individual serving, making them great for parties, lunchboxes, or sharing.
Ingredients
-
Pie Dough: 1 double-crust recipe of your favorite homemade pie dough, or 1 box of refrigerated prepared pie dough.
-
Pumpkin Pie Mix: 1 can (30 oz) of pre-mixed pumpkin pie filling (like Libby’s Easy Pumpkin Pie Mix).
-
Egg: 1 large egg (beaten, for the egg wash).
-
Powdered Sugar: 1 ½ cups, sifted (for the glaze).
-
Milk or Cream: 2-3 tablespoons (to thin the glaze).
-
Vanilla Extract: ½ teaspoon (for the glaze).
Step-by-Step Instructions
Step 1: Pre-Bake the Pumpkin Filling
Preheat your oven to 375°F (190°C). Pour the canned pumpkin pie filling onto a parchment-lined rimmed cookie sheet. Spread it out evenly. Bake for 15 to 20 minutes, or just until the filling has solidified enough to be easily scoopable and holds its shape. Remove from the oven and let it cool completely.
Step 2: Portion and Press the Dough
Divide your chilled pie dough into 3-ounce portions. Roll each portion into a smooth ball. Line a tortilla press with two sheets of parchment paper or plastic wrap. Place a dough ball in the center and gently press it down until you have a flat, even circle, about 1/8-inch thick. If you do not have a tortilla press, a traditional rolling pin works perfectly fine.
Step 3: Fill and Fold
Scoop a generous dollop (about 2-3 tablespoons) of the cooled, pre-baked pumpkin filling onto one half of the flattened dough circle. Leave a small border around the edge. Brush the edges lightly with the beaten egg wash, then fold the empty half of the dough over the filling to create a half-moon shape.
Step 4: Crimp and Vent
Use the tines of a fork to firmly crimp the edges together, ensuring a tight seal so the filling does not leak out during baking. Transfer the sealed hand pies to a parchment-lined baking sheet. Cut two or three small slits in the top of each pie to allow steam to escape. Brush the tops lightly with the remaining egg wash.
Step 5: Bake to Golden Brown
Bake the hand pies at 375°F (190°C) for 20 to 25 minutes. You are looking for a beautiful, even golden-brown crust. Once baked, transfer the pies to a wire cooling rack and allow them to cool completely before glazing.
Step 6: Glaze the Hand Pies
In a small bowl, whisk together the powdered sugar, vanilla extract, and 2 tablespoons of milk. If the glaze is too thick, add a few more drops of milk until you reach a consistency that is thick but easily drizzleable. Spoon or pipe the glaze over the cooled hand pies in a zigzag pattern, or dip the tops directly into the glaze for full coverage. Let the glaze set before serving.
Expert Cooking Tips
-
Keep the Dough Cold: Pie dough is much easier to work with when it is cold. If your kitchen is warm and the dough starts getting sticky while you are assembling, pop the baking sheet in the fridge for 10 minutes.
-
The Tortilla Press Trick: Using a tortilla press for 3-ounce dough balls guarantees uniform thickness and perfectly round circles with minimal effort or mess.
-
Cool the Filling Completely: Do not add warm pumpkin filling to the cold pie crust. The heat will melt the butter in the dough, resulting in a tough crust rather than a flaky one.
-
Do Not Overfill: It is tempting to pack these full, but overfilling will cause the seams to burst in the oven. Stick to about 2 to 3 tablespoons of filling per pie.
-
Glaze on Cool Pies Only: If you add the sweet vanilla glaze while the pastries are still warm, it will melt off completely. Patience is key for that perfect bakery-style finish.
Variations to Try
-
Cinnamon Maple Glaze: Swap the vanilla extract in the glaze for a dash of maple syrup and a pinch of cinnamon to enhance the fall flavors.
-
Apple Cinnamon Filling: Use the same dough and glaze technique, but swap the pre-baked pumpkin for a thick, cooked-down homemade apple pie filling.
-
Sanding Sugar Topping: If you prefer to skip the wet glaze, simply brush the unbaked pies with egg wash and sprinkle them generously with coarse turbinado or sanding sugar before baking.
What to Serve With Pumpkin Hand Pies
These handheld treats are incredibly versatile. Serve them slightly warmed alongside a steaming mug of dark roast coffee or hot apple cider for a cozy afternoon treat. For a more decadent plated dessert, serve a warm pumpkin hand pie with a generous scoop of vanilla bean ice cream and a drizzle of warm caramel sauce.
Storage & Reheating
Refrigerator
Store leftover glazed hand pies in an airtight container in the refrigerator for up to 4 days. Because of the pumpkin filling, they need to be kept chilled.
Freezer
You can freeze unbaked, unglazed hand pies for up to 3 months. Freeze them solid on a baking sheet, then transfer them to a freezer-safe bag. Bake directly from frozen, adding a few extra minutes to the baking time. Fully baked and glazed pies can also be frozen, though the glaze may become slightly sticky upon thawing.
Reheating
To restore the flaky crust on refrigerated pies, warm them in an oven or toaster oven at 350°F (175°C) for about 5-8 minutes. Microwaving is not recommended as it will make the pastry soft and melt the glaze entirely.
Frequently Asked Questions
Why do I need to pre-bake the pumpkin filling?
Pumpkin pie filling is naturally very wet and custardy. If you put it directly into a sealed dough pocket, the moisture will make the bottom crust soggy, and it will leak everywhere. Baking it first evaporates excess moisture and firms it up, making it easy to scoop.
Can I use pure pumpkin puree instead of pie mix?
Yes, but you will need to add your own sugar, spices (cinnamon, nutmeg, ginger, cloves), and a binder (like a beaten egg) before pre-baking it on the sheet pan, otherwise, it will be bland. Using Libby’s Easy Pumpkin Pie Mix saves you this step.
Do I have to use a tortilla press?
Not at all. The tortilla press is a fantastic, mess-free shortcut for flattening the dough evenly, but a standard rolling pin works just as well. Simply roll your 3-ounce dough balls into 5-inch circles on a lightly floured surface.
Why did my hand pies leak in the oven?
Leaking usually occurs for two reasons: the pies were overfilled, or the edges were not crimped tightly enough. Be sure to leave a clean border, use a light egg wash to act as glue, and press down firmly with a fork to seal the edges.
Can I use store-bought pie crust?
Absolutely. Refrigerated, store-bought pie crust works wonderfully for this recipe and saves a lot of time. Just let it come to room temperature slightly so you can easily form it into the 3-ounce balls before pressing.
Final Thoughts
Making vintage-style pumpkin hand pies at home is incredibly rewarding and much easier than you might think. By utilizing the clever trick of pre-baking your filling and using a tortilla press for the dough, you eliminate the mess and frustration typically associated with pastry making. The result is a beautifully glazed, flaky, and nostalgic dessert that completely outshines anything you could buy in a store. Grab your favorite pie dough and give this fun, foolproof technique a try!
Homemade Pumpkin Hand Pies
A nostalgic, vintage-style treat featuring flaky pie crust, pre-baked scoopable pumpkin filling, and a sweet vanilla glaze.
Ingredients
Equipment
Method
- Pre-bake filling: Preheat oven to 375°F (190°C). Spread the pumpkin pie filling evenly onto a parchment-lined baking sheet. Bake for 15-20 minutes until it solidifies and becomes scoopable. Let cool completely.
- Prep dough: Divide your chilled pie dough into 3-ounce portions and roll into balls.
- Flatten: Line a tortilla press with plastic wrap or parchment and press each ball into a flat 1/8-inch thick circle. (Alternatively, use a rolling pin).
- Assemble: Place 2-3 tablespoons of the cooled pumpkin filling on one half of the dough circle.
- Seal: Brush the edges lightly with egg wash, fold the dough over into a half-moon, and firmly crimp the edges closed with a fork.
- Vent and Bake: Place the pies on a parchment-lined baking sheet. Cut small steam vents in the top of each pie and brush the tops with egg wash. Bake at 375°F (190°C) for 20-25 minutes until golden brown.
- Cool: Transfer to a wire rack to cool completely.
- Glaze: Whisk together powdered sugar, milk, and vanilla. Drizzle or pipe the glaze over the cooled hand pies and let set before serving.
Notes
Cool the filling: Do not put warm filling on cold dough, or the crust will become tough and lose its flakiness.
Storage: Keep leftover glazed hand pies in an airtight container in the refrigerator for up to 4 days.