Cheesy Stuffed Cabbage Cups (Easy Muffin-Tin Dinner)
Cheesy Stuffed Cabbage Cups – Easy, Hearty, and Delicious
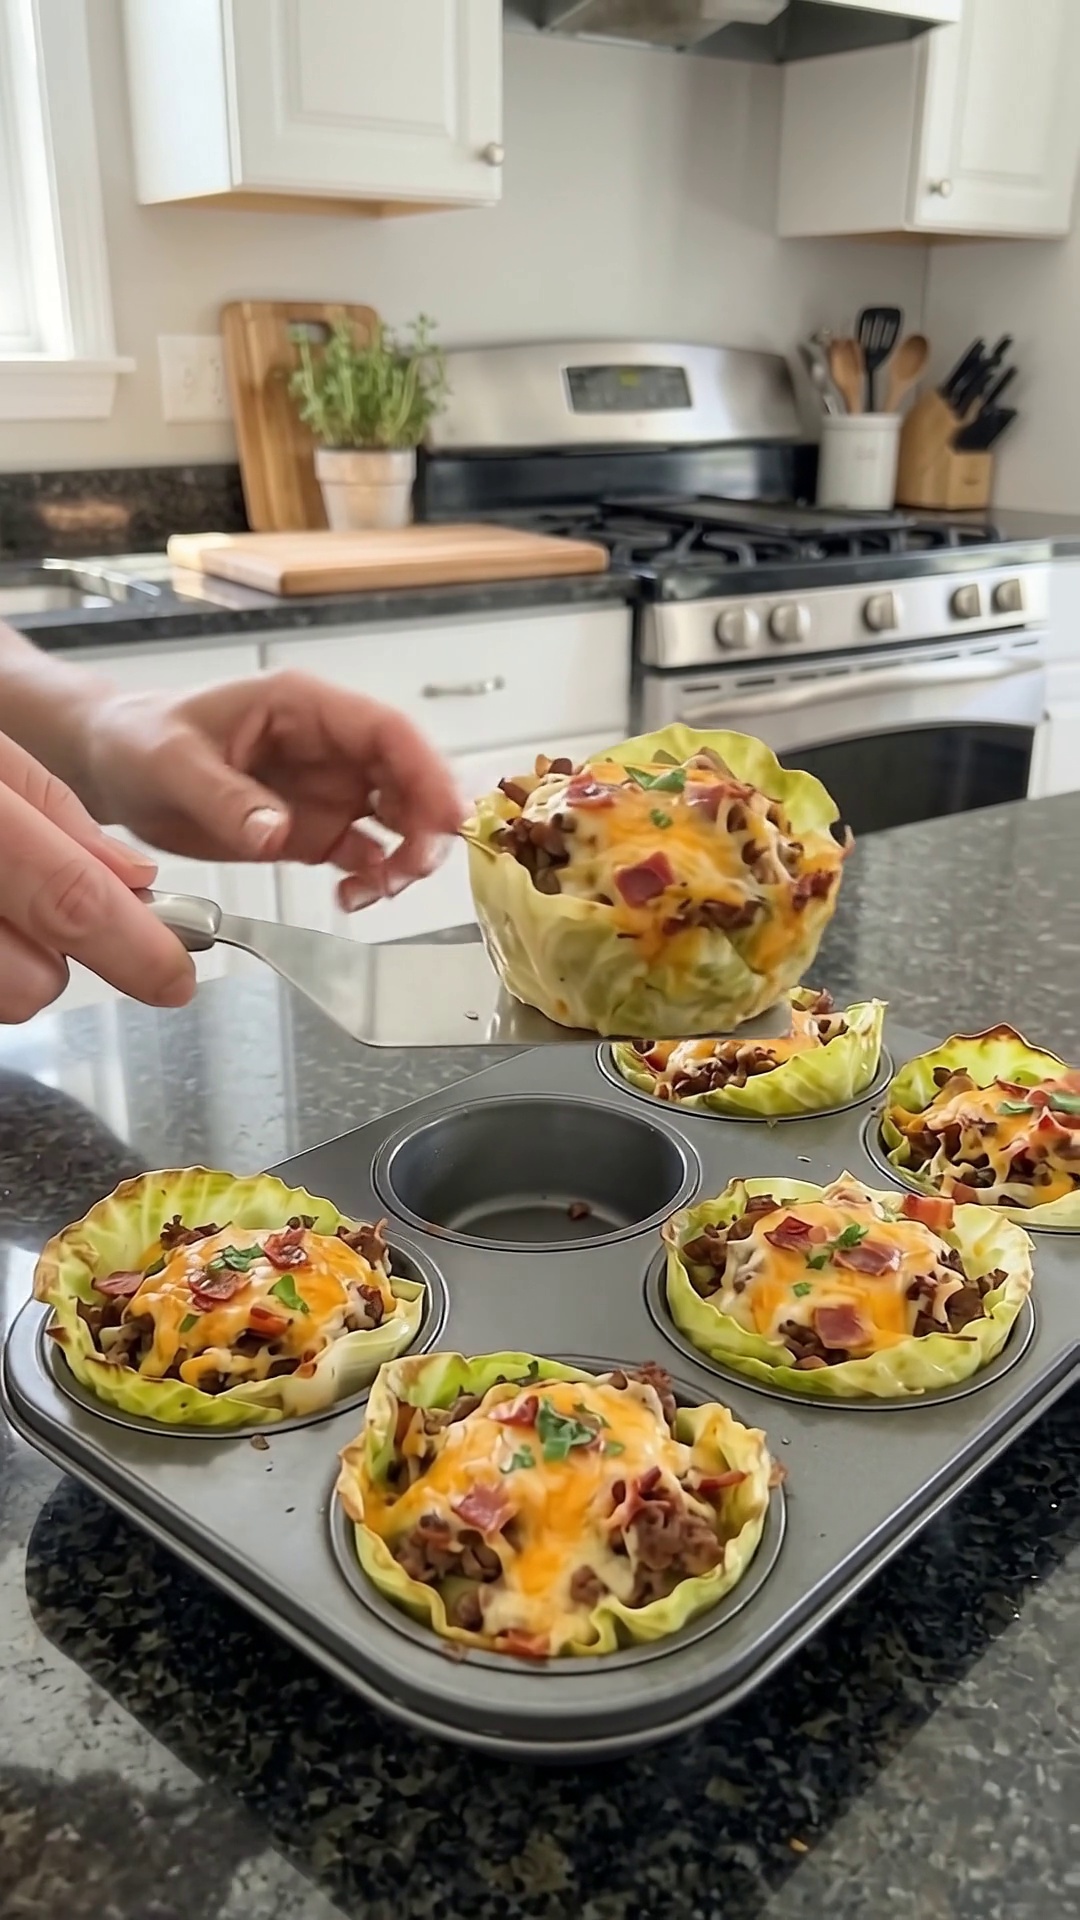
Cheesy stuffed cabbage cups turn familiar comfort-food ingredients into individual portions with melted cheddar and a little crispy bacon on top. Tender cabbage leaves hold a savory ground beef filling, giving you a hearty dinner without the work of rolling and tucking each leaf into a traditional cabbage roll.
A muffin tin supports the leaves while they bake and makes serving straightforward. Add the optional cooked rice for a fuller filling, or leave it out and serve the cups with mashed potatoes, roasted vegetables, or a fresh salad. They are a practical choice for family dinners and leftovers you can portion easily.
Prep: About 20 minutes | Oven bake: 20–25 minutes, plus stovetop cooking and resting | Yield: 6 cabbage cups | Course: Main course | Cuisine: American-inspired
Ingredients for Cheesy Stuffed Cabbage Cups
- 6 large green cabbage leaves
- 1 pound ground beef, 80–85% lean
- 1 small yellow onion, finely diced
- 2 garlic cloves, minced
- 1 cup shredded cheddar cheese
- ¼ cup cooked bacon, crumbled
- ½ cup cooked white rice, optional
- 1 tablespoon tomato paste
- ½ teaspoon smoked paprika
- ½ teaspoon garlic powder
- ½ teaspoon salt, or to taste
- ¼ teaspoon freshly ground black pepper
- 1 tablespoon olive oil
- 2 tablespoons chopped fresh parsley, for garnish
You will also need a little cooking spray or oil to grease the pan and salted water for blanching. Choose broad, intact cabbage leaves that can line each muffin cup without tearing. Freshly shredded cheddar melts smoothly, and the bacon should already be cooked before assembly.
How to Make Stuffed Cabbage Cups
1. Soften the Cabbage Leaves
Bring a large pot of salted water to a boil. Carefully separate six large cabbage leaves and blanch them for 2–3 minutes, until flexible. Transfer to cold water to stop cooking, then drain and pat thoroughly dry.
If the center rib is too thick to fold, carefully shave it down with a small knife. Leave the leaf intact underneath so it can hold the filling.
2. Cook the Beef Filling
Heat the olive oil in a large skillet over medium heat. Cook the diced onion for about 3 minutes, until softened, then add the minced garlic and cook another 30 seconds.
Add the ground beef and break it into small pieces. Cook for 6–8 minutes, until thoroughly browned and cooked through. Drain excess grease as needed. Stir in the tomato paste, smoked paprika, garlic powder, salt, and pepper. Fold in the optional cooked rice, then remove from the heat.
3. Line the Muffin Tin
Preheat the oven to 375°F (190°C). Lightly grease six cups of a standard muffin tin. Press one softened cabbage leaf against the bottom and sides of each cup, letting the edges extend a little above the rim.
Fit the leaves gently instead of forcing thick folds into the bottom. The muffin tin should support the cabbage while leaving room for the beef and toppings.
4. Fill and Top
Divide the cooked beef mixture evenly among the cabbage-lined cups. Press lightly with the back of a spoon, then distribute the shredded cheddar and crumbled cooked bacon over the tops.
Avoid packing the filling into tall, unstable mounds. Cabbage leaves and muffin tins vary in size, so keep the portions supported by the cups rather than spilling over the sides.
5. Bake Until Melted and Tender
Bake for 20–25 minutes, until the cabbage is tender, the filling is hot throughout, and the cheddar is melted. For a lightly browned topping, optionally broil for 1–2 minutes, watching closely so the exposed cabbage edges do not burn.
6. Rest, Remove, and Serve
Let the cups rest in the tin for about 5 minutes. Slide a spoon or small spatula underneath each one and lift gently onto a plate. Garnish with the chopped parsley and serve warm.

The cups are tender, so support them from underneath when transferring. A few minutes of resting helps the filling settle and makes removal easier.

Tips and Easy Variations
Dry the leaves well. Moisture left after blanching can collect at the bottom of the tin. Pat the folds dry before assembly.
Drain the filling. Removing excess beef grease keeps the cups from becoming overly oily and makes the cheese topping more pleasant.
Keep the rice cooked. This recipe uses cooked rice; uncooked grains will not soften properly in the short baking time.
For an Italian-style variation, use mozzarella with a little Italian seasoning and marinara. Ground turkey can replace the beef; cook it fully before filling the cups. Keep the original cheddar-and-bacon version for the flavor described here.
Storage and Reheating
Refrigerate leftovers promptly in an airtight container for up to 3–4 days. Freeze cooled cups for up to 2 months, separating layers with parchment, and thaw overnight in the refrigerator.
Reheat in an oven-safe dish at 350°F, loosely covered with foil, for about 15–20 minutes or until thoroughly hot. Reheat leftovers to 165°F. Add a side of green beans, roasted carrots, or mashed potatoes to make a complete meal.
Frequently Asked Questions
Can I prepare these ahead?
Yes. Refrigerate the prepared leaves and cooked beef filling separately, then assemble and bake when ready. Cold filling may need extra heating time.
Can I use ground turkey?
Yes. Cook the turkey thoroughly to 165°F before assembly, then season and bake the cups using the same method.
Do I need to add rice?
No. The ½ cup of cooked white rice is optional. The beef, cabbage, cheese, and bacon make a satisfying filling on their own.
Why are my cabbage cups watery?
Cabbage releases moisture during cooking. Dry the blanched leaves carefully and drain excess grease from the beef to limit liquid collecting in the tin.