Best Crispy Cast Iron Hasselback Potatoes Recipe
Best Crispy Cast Iron Hasselback Potatoes
An Elegant Upgrade to the Classic Baked Potato
If you are looking for a side dish that delivers the ultimate combination of visual appeal and incredible texture, these cast iron Hasselback potatoes are the answer. At first glance, they look like an intricate, highly technical culinary creation reserved for fine dining restaurants. In reality, this stunning preparation is remarkably simple to achieve at home with just a sharp knife and a reliable cast iron skillet.
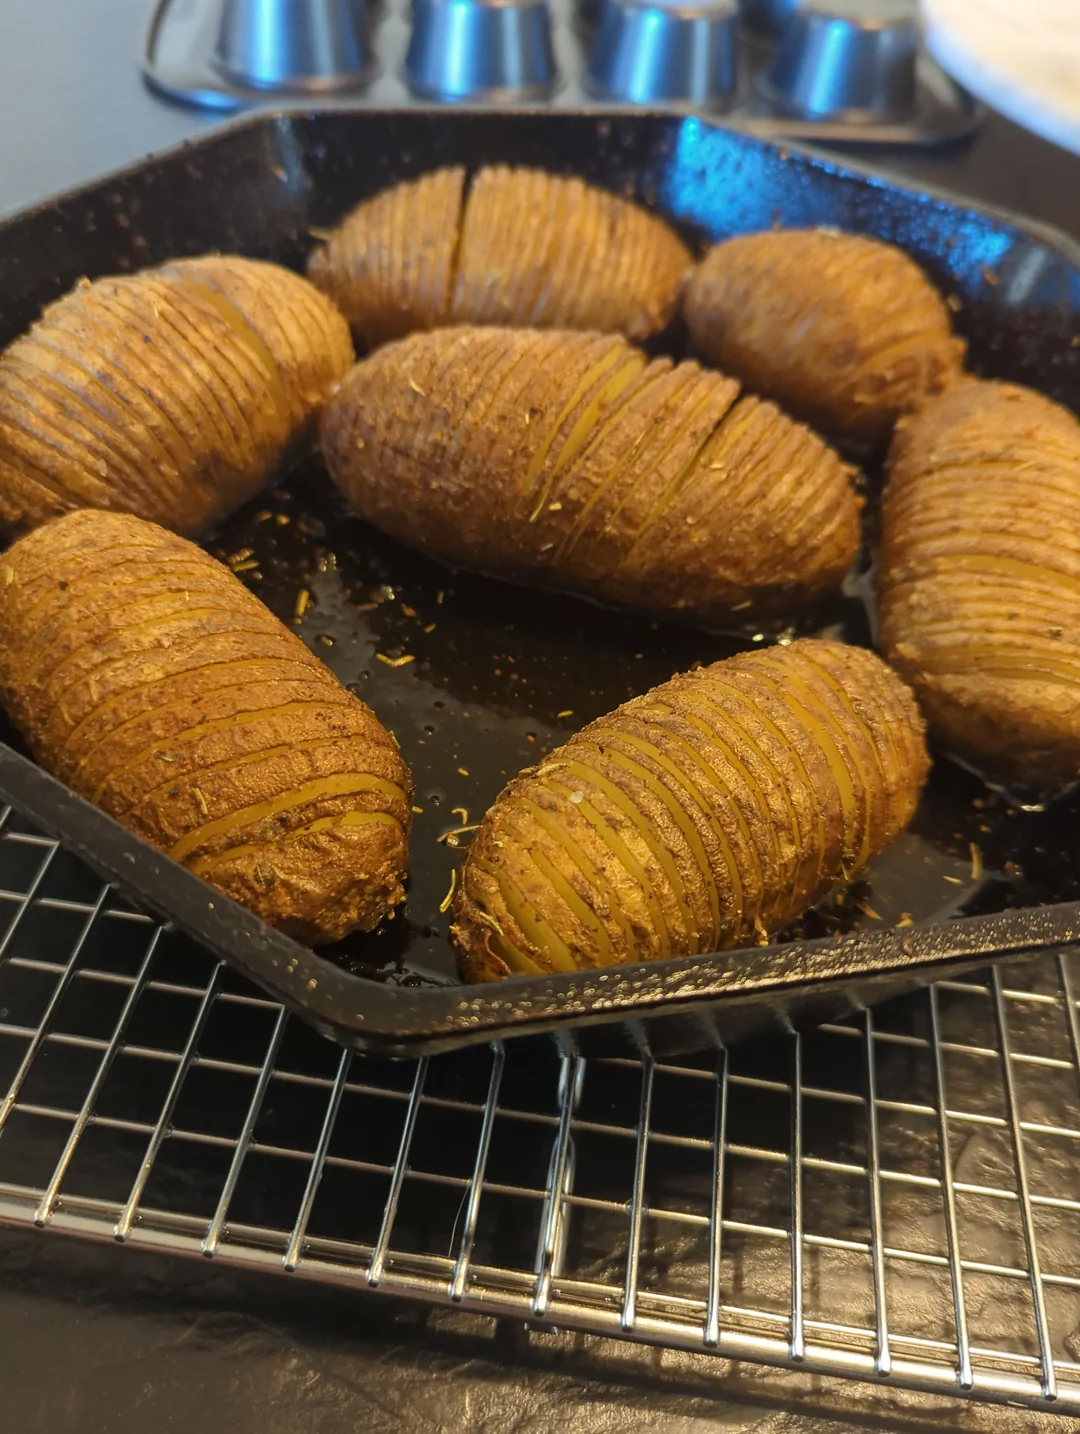
The brilliance of the Hasselback technique lies in the thin, accordion-style slices that go almost—but not completely—through the potato. As the potato roasts in a hot oven, these thin slices fan out slightly. This exposes maximum surface area to the hot fat in your skillet, resulting in edges that become incredibly crispy and golden brown, much like a thick-cut potato chip.
Meanwhile, the interior of the potato remains deeply soft, fluffy, and tender, exactly like a perfect baked potato. By utilizing a cast iron skillet for the roasting process, you ensure even heat distribution and a phenomenally crispy bottom that glass or ceramic baking dishes simply cannot replicate. It is a stunning, rustic side dish that pairs wonderfully with everything from heavy roasts to smooth, comforting autumn soups.
Why You’ll Love This Recipe
-
Incredible Texture: You get the absolute best of both worlds—the crispy, savory edges of a French fry combined with the fluffy, tender center of a baked potato.
-
Show-Stopping Presentation: The fanned-out, accordion-like slices look elegant and sophisticated on any dinner plate.
-
Maximum Flavor: Every single slice acts as a pocket for melted butter, olive oil, salt, and fresh herbs to seep deep into the potato.
-
Simple Ingredients: You only need potatoes, fat, and a few basic pantry seasonings to create this masterpiece.
-
Cast Iron Perfection: The heavy cast iron skillet guarantees a gorgeous, caramelized crust on the bottom of every potato.
Ingredients
-
Potatoes: 6 medium-sized potatoes. Russets or Yukon Golds work best due to their starchy, fluffy interiors.
-
Butter: 4 tablespoons of unsalted butter, melted.
-
Olive Oil: 2 tablespoons of extra-virgin olive oil. Mixing oil with butter prevents the milk solids from burning at high heat.
-
Garlic: 3 cloves of fresh garlic, minced finely.
-
Fresh Herbs: 1 tablespoon of chopped fresh rosemary or thyme (dried herbs work well in a pinch).
-
Salt: 1 teaspoon of coarse kosher salt or flaky sea salt.
-
Black Pepper: 1/2 teaspoon of freshly cracked black pepper.
Step-by-Step Instructions
Step 1: Prep the Potatoes
Preheat your oven to 425°F (220°C). Scrub the potatoes thoroughly under cold water to remove any dirt. You can choose to leave the skins on for a rustic texture or peel them for a more refined look. Pat the potatoes completely dry with paper towels.
Step 2: Slice the Potatoes
Place a potato on a cutting board. Lay two chopsticks, wooden spoons, or butter knives lengthwise along both sides of the potato. Using a sharp chef’s knife, make thin, even crosswise slices (about 1/8 to 1/4-inch thick) all the way down the potato. The chopsticks will stop your knife from slicing all the way through, keeping the base intact.
Step 3: Prepare the Herb Butter
In a small bowl, whisk together the melted butter, olive oil, minced garlic, chopped fresh rosemary (or thyme), kosher salt, and black pepper.
Step 4: Coat the Potatoes
Place the sliced potatoes into your cast iron skillet. Using a silicone basting brush, generously brush the potatoes with the herb butter mixture. Gently bend the potatoes slightly to fan out the slices, making sure to brush the seasoned butter deep down into the cuts.
Step 5: Roast and Baste
Place the cast iron skillet in the preheated oven. Roast for 30 minutes. Remove the skillet from the oven and carefully baste the potatoes again, using the melted butter that has pooled at the bottom of the skillet.
Step 6: Finish Baking
Return the skillet to the oven and roast for an additional 25 to 30 minutes. The potatoes are done when the edges are deeply golden brown and crispy, and the centers are completely tender when pierced with a paring knife. Let them rest in the pan for 5 minutes before serving.
Expert Cooking Tips
-
The Chopstick Trick: Do not skip using guides when cutting! Placing chopsticks or wooden spoons beside the potato is the most foolproof way to ensure you never slice all the way through the bottom.
-
Choose Uniform Potatoes: Try to select potatoes that are roughly the same size and shape so they all finish baking at the exact same time.
-
Dry Thoroughly: Moisture prevents crisping. Make sure your washed potatoes are completely dry before you start slicing and buttering them.
-
Baste Generously: Basting the potatoes halfway through the cooking time is crucial. As the slices open up in the heat, basting ensures the butter and salt penetrate all the way to the center.
-
Preheat the Cast Iron: For an extra crispy bottom crust, place your empty cast iron skillet in the oven while it preheats. Carefully place the prepped potatoes into the screaming-hot pan.
Variations to Try
-
Loaded Hasselback Potatoes: During the last 5 minutes of baking, stuff shredded cheddar cheese and crispy bacon bits into the slices. Top with sour cream and chives after baking.
-
Spicy Cajun: Mix a tablespoon of your favorite Cajun or Creole seasoning blend into the melted butter before brushing.
-
Parmesan Truffle: Skip the fresh herbs and instead toss the finished, roasted potatoes with a drizzle of truffle oil and a heavy dusting of finely grated Parmesan cheese.
What to Serve With Hasselback Potatoes
Because of their impressive presentation, Hasselback potatoes are the perfect side dish for holiday centerpieces like a prime rib roast, a whole roasted chicken, or a thick, reverse-seared steak.
They also provide a fantastic textural contrast to smooth, pureed meals. Serving these crispy potatoes alongside a warm, comforting bowl of roasted butternut squash and onion soup creates an incredibly cozy, satisfying autumnal dinner. The savory, buttery crunch of the potato perfectly offsets the sweet, earthy richness of the squash soup.
Storage & Reheating
Refrigerator
Allow any leftover potatoes to cool completely to room temperature. Store them in an airtight container in the refrigerator for up to 4 days.
Freezer
Freezing is not recommended for this recipe. Cooked potatoes tend to become mealy, grainy, and waterlogged when frozen and thawed, and the delicate crispy edges will be completely lost.
Reheating
To bring the crispiness back to life, avoid the microwave. Place the leftover potatoes on a baking sheet or right back into your cast iron skillet. Bake in a 400°F (200°C) oven for 10 to 15 minutes until they are heated through and the edges are crunchy again.
Frequently Asked Questions
What kind of potato is best for Hasselback potatoes?
Starchy potatoes, like Russets or Idaho potatoes, yield the fluffiest interior and the crispiest exterior. Yukon Golds are also a great option; they have a slightly waxier texture but offer a naturally rich, buttery flavor that works beautifully with this method.
Why didn’t my potatoes fan out?
If your slices didn’t open up, they may have been cut too thick, or the potato may have been overcrowded in the pan. Make sure your slices are thin (about 1/8 inch) and give the potatoes a little room to expand in the cast iron skillet. Basting halfway through also helps force the slices open.
Do I have to peel the potatoes first?
No, peeling is completely optional. Leaving the skins on adds a great rustic texture and extra crispiness to the edges. Just be sure to scrub the skins thoroughly before slicing.
Can I prep these ahead of time?
You can slice the potatoes a few hours in advance, but you must keep them completely submerged in a bowl of cold water in the refrigerator so they do not oxidize and turn brown. Drain and dry them thoroughly before coating them with butter and roasting.
Why are my potatoes still hard in the middle?
Oven temperatures and potato sizes vary wildly. If the outside is browning too quickly but the inside is still firm, tent a piece of aluminum foil over the cast iron skillet to protect the edges, and continue baking until the center is tender.
Final Thoughts
Mastering cast iron Hasselback potatoes will completely change your side-dish game. With their gorgeous presentation, irresistibly crispy edges, and buttery, tender centers, they feel like a gourmet upgrade to standard roasted potatoes. Grab your skillet, practice the chopstick slicing trick, and prepare to amaze your dinner guests!
Best Crispy Cast Iron Hasselback Potatoes
Stunning, accordion-sliced potatoes roasted in a cast iron skillet with butter, garlic, and fresh herbs until the edges are crispy and the centers are fluffy.
Ingredients
Method
- Preheat oven to 425°F (220°C). Scrub and thoroughly dry the potatoes.
- Place a potato on a cutting board between two chopsticks. Use a sharp knife to make thin slices (1/8-inch thick) across the potato, letting the chopsticks stop the blade from cutting all the way through. Repeat with all potatoes.
- In a small bowl, whisk together the melted butter, olive oil, minced garlic, herbs, salt, and pepper.
- Place the sliced potatoes in a cast iron skillet. Brush generously with the herb butter, ensuring it drips down into the slices.
- Roast in the oven for 30 minutes.
- Remove from the oven and baste the potatoes again using the butter pooled in the skillet. Gently fan the slices open with your brush.
- Return to the oven and roast for another 25-30 minutes until the edges are crispy and the centers are tender.
- Rest for 5 minutes before serving.
Notes
Slicing Guide: Do not skip the chopsticks! It is the easiest way to prevent ruining the base of the potato.