Spiderweb Cheesecake Bites (Easy Halloween Recipe)
Spiderweb Cheesecake Bites (Easy Halloween Mini Cheesecakes)
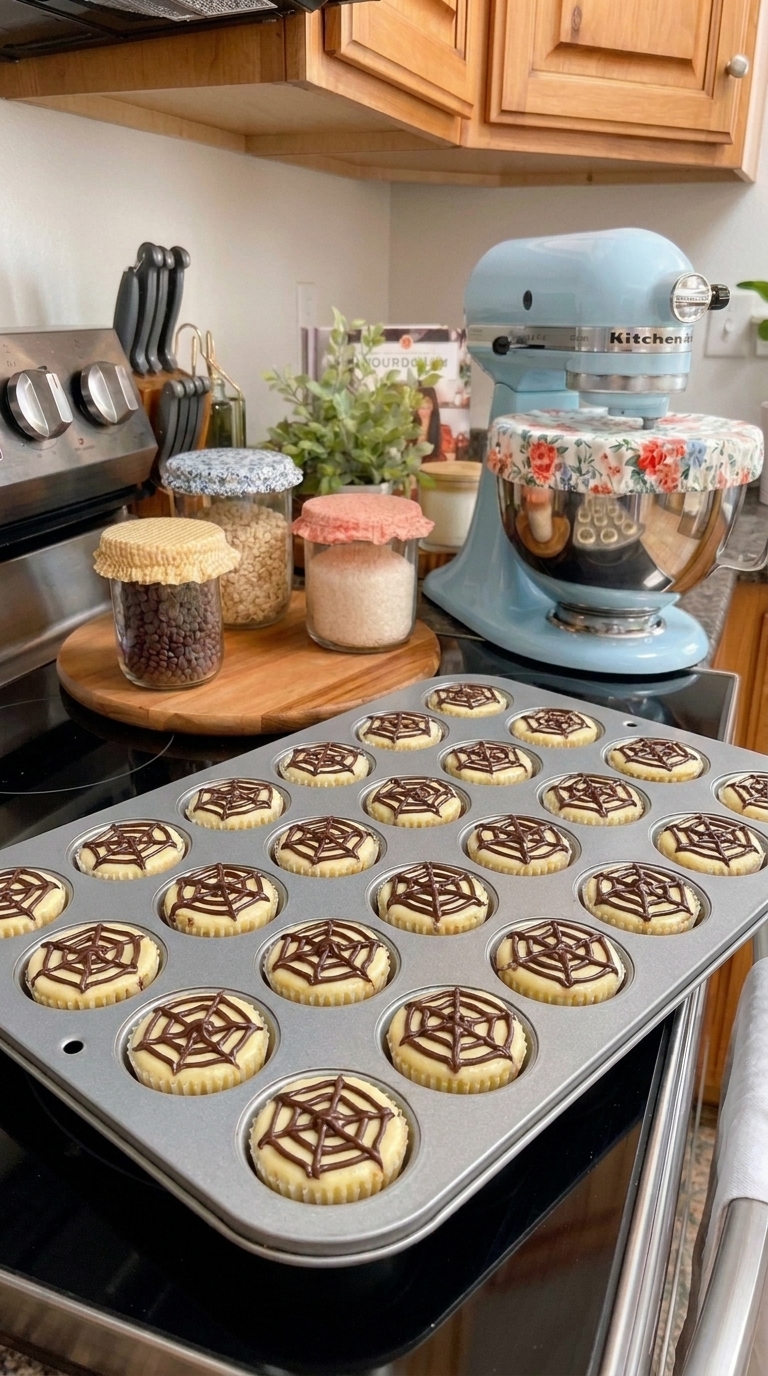
These Spiderweb Cheesecake Bites are the cutest little Halloween desserts! Each one has a buttery graham cracker crust, a smooth and creamy cheesecake filling, and a chocolate spiderweb design on top.
They look like something you’d find in a bakery, but they’re surprisingly easy to make at home. You don’t need special decorating skills, fancy molds, or complicated ingredients. All it takes is a little melted chocolate and a toothpick to create those spooky spiderweb patterns.
I especially love that these mini cheesecakes are made in a regular 24-cup mini muffin pan. They’re just the right size for Halloween parties, classroom celebrations, fall gatherings, or a fun dessert after dinner.
And because they need time to chill, you can make them ahead of your Halloween celebration.
Why You’ll Love These Spiderweb Cheesecake Bites
- Perfect for Halloween: The chocolate spiderweb decorations make them festive without being overly complicated.
- Individual servings: No slicing or serving utensils needed.
- Creamy cheesecake filling: Made with real cream cheese, eggs, sugar, and vanilla.
- Simple ingredients: Only seven ingredients are needed.
- Make-ahead friendly: Prepare them the day before your party.
- Fun to decorate: Creating the chocolate webs is an enjoyable kitchen activity.
They’re also a nice alternative to traditional Halloween cookies and cupcakes.
Ingredients You’ll Need
Graham Cracker Crumbs — 1 Cup
Graham cracker crumbs create the sweet, slightly crunchy base for each cheesecake bite.
Use finely crushed crumbs so the crust presses together easily.
Unsalted Butter — 3 Tablespoons, Melted
Melted butter binds the graham cracker crumbs together and helps form the crust.
Cream Cheese — 16 oz, Softened
Use two 8-ounce packages of regular cream cheese. Full-fat cream cheese gives the filling a rich, creamy texture.
Let the cream cheese soften before mixing to help prevent lumps.
Granulated Sugar — ½ Cup
Sugar sweetens the cheesecake without overpowering the cream cheese flavor.
Large Eggs — 2
Eggs help the cheesecake filling set while baking.
Vanilla Extract — 1 Teaspoon
Vanilla adds warmth and rounds out the flavor of the cheesecake.
Semi-Sweet Chocolate Chips — ¼ Cup, Melted
Melted chocolate is used to pipe the spiderweb designs on top.
Semi-sweet chocolate provides a nice contrast to the sweet, creamy filling.
How to Make Spiderweb Cheesecake Bites
Step 1: Prepare the Muffin Pan
Preheat your oven to 325°F.
Line a 24-cup mini muffin pan with paper liners.
The liners help you remove the cheesecake bites without damaging their delicate crusts.
Step 2: Make the Graham Cracker Crust
In a small bowl, combine the graham cracker crumbs and melted butter.
Stir until the crumbs are evenly moistened.
Place approximately 1 teaspoon of the mixture into each mini muffin liner.
Press the crumbs firmly into the bottom to form a compact crust.
Step 3: Prepare the Cheesecake Filling
In a large mixing bowl, beat the softened cream cheese and granulated sugar until smooth.
Add the eggs one at a time, mixing gently after each addition.
Stir in the vanilla extract.
Avoid overmixing once the eggs are added, since too much air can cause the cheesecakes to puff up and crack.
Step 4: Fill the Muffin Cups
Spoon the cheesecake mixture over the prepared graham cracker crusts.
Fill each liner almost to the top, leaving a little space for the batter to rise.
Try to divide the filling evenly so all the cheesecake bites bake at the same rate.
Step 5: Melt the Chocolate
Place the semi-sweet chocolate chips in a microwave-safe bowl.
Heat in short intervals, stirring between each interval, until smooth.
Transfer the melted chocolate to a small piping bag or a zip-top bag.
Snip a very small opening in one corner.
Step 6: Create the Spiderweb Designs
Pipe two or three thin circles of melted chocolate onto the surface of each unbaked cheesecake.
Add a small chocolate dot in the center if desired.
Using a toothpick, gently drag from the center outward through the chocolate circles.
Repeat around the surface to create a spiderweb pattern.
Wipe the toothpick between strokes for cleaner lines.
Step 7: Bake
Place the muffin pan in the preheated oven.
Bake for 12–15 minutes, until the edges are set and the centers still have a slight wobble.
Avoid overbaking, which can make the cheesecake filling dry or cause the tops to crack.
Step 8: Cool and Chill
Allow the cheesecake bites to cool completely.
Then refrigerate them for at least 2 hours before serving.
Chilling allows the filling to firm up and makes the mini cheesecakes easier to remove from their liners.
Tips for Perfect Mini Spiderweb Cheesecakes
Soften the cream cheese. Room-temperature cream cheese mixes more smoothly and helps prevent lumps.
Don’t overmix the eggs. Mix only until incorporated to avoid adding too much air.
Press the crust firmly. A compact graham cracker base is less likely to crumble when you remove the paper liner.
Use a small piping opening. Thin chocolate lines create a more detailed spiderweb design.
Work carefully with the toothpick. Drag lightly through the chocolate without disturbing too much cheesecake batter.
Don’t overbake. The centers should still wobble slightly when you remove the pan from the oven.
Chill before serving. The cheesecake bites need time in the refrigerator to develop their final texture.
Fun Halloween Decorating Ideas
The classic chocolate spiderweb design looks beautiful on its own, but you can add other Halloween touches.
Chocolate Spiders: Use a small amount of extra melted chocolate to pipe tiny spiders onto the chilled cheesecakes.
Orange and Black Sprinkles: Add a few Halloween-colored sprinkles around the edges before serving.
Mini Chocolate Chips: Place a couple of tiny chocolate chips in the center of each web.
White Chocolate Webs: Use melted white chocolate for a different look, especially if you’re making chocolate-flavored mini cheesecakes.
These optional decorations are not included in the original seven-ingredient recipe.
How to Store Spiderweb Cheesecake Bites
Because these mini cheesecakes contain cream cheese and eggs, they should be stored in the refrigerator.
Place the completely cooled cheesecake bites in an airtight container and refrigerate for up to 4 days.
For longer storage, freeze them in a freezer-safe container for up to 2 months. Separate layers with parchment paper to protect the decorations.
Thaw overnight in the refrigerator before serving.
For the best flavor and texture, serve them chilled.
Frequently Asked Questions
Can I make spiderweb cheesecake bites ahead of time?
Yes! These are a great make-ahead Halloween dessert. Prepare them the day before and keep them refrigerated until you’re ready to serve.
Can I use regular muffin pans instead?
Yes, but you’ll make fewer, larger cheesecakes, and they’ll need a longer baking time. The original recipe is designed for a 24-cup mini muffin pan.
Why did my mini cheesecakes crack?
Cracking can happen from overmixing the batter or baking the cheesecakes too long. Mix gently after adding the eggs and remove them when the centers still wobble slightly.
How do I make the chocolate spiderweb pattern?
Pipe thin chocolate circles onto the unbaked cheesecake batter, then drag a toothpick from the center outward through the circles.
Do these mini cheesecakes need to be refrigerated?
Yes. Refrigerate the finished cheesecake bites and keep them chilled until serving.
A Fun Halloween Dessert Everyone Will Love
These Spiderweb Cheesecake Bites are an easy way to make your Halloween dessert table feel extra special.
With their creamy filling, buttery graham cracker crust, and adorable chocolate spiderweb tops, they’re a delicious treat that looks much more complicated than it really is.
Whether you’re hosting a Halloween party or just baking something festive for your family, these little cheesecakes are sure to be a hit.
Spiderweb Cheesecake Bites
Ingredients
Method
- Preheat the oven to 325°F and line a 24-cup mini muffin pan with paper liners.
- Combine the graham cracker crumbs and melted butter. Press approximately 1 teaspoon of the mixture into the bottom of each liner.
- Beat the softened cream cheese and sugar until smooth.
- Add the eggs one at a time, then mix in the vanilla extract. Avoid overmixing.
- Spoon the cheesecake filling into the prepared muffin cups, filling almost to the top.
- Melt the chocolate chips and transfer the melted chocolate to a piping bag with a small opening.
- Pipe 2–3 thin concentric circles onto each cheesecake.
- Drag a toothpick gently from the center outward through the circles to create a spiderweb pattern.
- Bake for 12–15 minutes, until the edges are set and the centers wobble slightly.
- Cool completely, then refrigerate for at least 2 hours before serving.