Christmas Cake Pops (Easy Red and Green Holiday Treats)
Christmas Cake Pops (Easy Red and Green Holiday Treats)
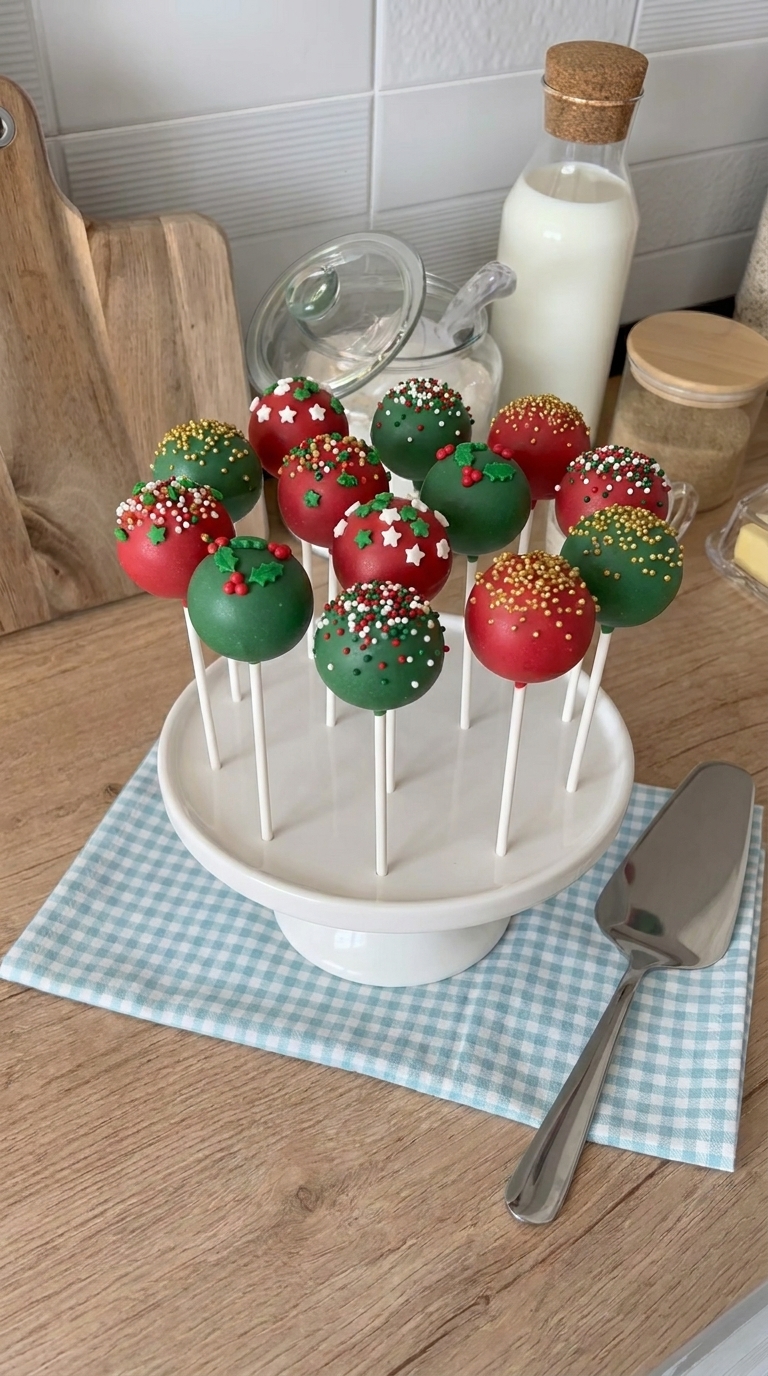
These Christmas Cake Pops are a fun way to turn an ordinary cake into something festive for the holidays. With soft cake centers, colorful red and green candy coating, and cheerful Christmas sprinkles, they’re almost too cute to eat!
You don’t need to be an experienced baker to make them. Start with a baked cake, mix the crumbs with a little vanilla frosting, roll them into balls, and dip them in melted candy coating.
They’re perfect for Christmas parties, school celebrations, holiday dessert trays, and homemade gifts. You can even prepare the cake balls ahead of time and decorate them closer to your celebration.
Why You’ll Love These Christmas Cake Pops
- Easy to customize: Use vanilla, chocolate, red velvet, or your favorite cake flavor.
- Beautiful holiday colors: Red and green candy melts give them a classic Christmas look.
- Great for parties: Each cake pop is an individual dessert that’s easy to serve.
- Fun to decorate: Christmas sprinkles, gold pearls, and edible holly make every pop unique.
- Make-ahead friendly: Prepare the centers in advance to save time.
This recipe is especially convenient if you already have a baked cake ready to use.
Ingredients You’ll Need
Baked Cake — One 9×13-Inch Cake
Use a completely cooled cake, either homemade or prepared from a boxed cake mix.
Vanilla, yellow, chocolate, and red velvet cake all work well. The cake should be fully cooled before you crumble it.
Vanilla Frosting — Up to ½ Cup
Frosting holds the cake crumbs together and creates a soft, truffle-like center.
Start with a few tablespoons and add more only as needed. Depending on how moist your cake is, you may not need the full amount.
Red Candy Melts — 8 oz
Red candy melts create the bright Christmas-red coating. They melt easily and set into a firm shell.
Green Candy Melts — 8 oz
Green candy melts give the other half of your cake pops their festive color.
Lollipop Sticks — Approximately 24
Use sturdy cake pop sticks to hold the cake balls while dipping and decorating.
Christmas Sprinkles
Choose your favorite holiday decorations, including red and white sprinkles, gold sugar pearls, tiny stars, or edible holly.
How to Make Christmas Cake Pops
Step 1: Crumble the Cake
Place your completely cooled cake into a large mixing bowl.
Break it apart with your hands or a fork until you have fine crumbs with no large pieces remaining.
The finer the crumbs, the smoother your finished cake pops will look.
Step 2: Add the Frosting
Add a few tablespoons of vanilla frosting to the cake crumbs.
Mix thoroughly, then add more frosting a little at a time until the mixture holds together when pressed.
You want a soft, moldable texture, not a wet or greasy mixture.
Step 3: Shape the Cake Balls
Line a baking sheet with parchment paper.
Scoop portions of the cake mixture and roll them into balls approximately 1½ inches wide.
Arrange the balls on the baking sheet and refrigerate for about 30 minutes, until firm.
Step 4: Attach the Sticks
Melt a small amount of candy coating in a microwave-safe bowl.
Dip about ½ inch of each lollipop stick into the melted coating, then gently insert it halfway into a chilled cake ball.
Repeat with the remaining cake balls.
Refrigerate for approximately 30 minutes, or until the coating around the sticks has hardened.
Step 5: Melt the Candy Coating
Place the red and green candy melts in separate microwave-safe bowls.
Heat in short intervals, stirring frequently, until smooth.
For easier dipping, transfer the melted coating to tall, narrow glasses.
Step 6: Dip the Cake Pops
Hold a cake pop by its stick and gently lower it into the melted candy coating.
Lift it straight out and let the excess coating drip back into the glass.
Tap the stick lightly if needed, but avoid shaking too hard because the cake ball could loosen.
Dip half the cake pops in red coating and the other half in green.
Step 7: Add Christmas Decorations
While the coating is still wet, sprinkle on your favorite holiday decorations.
Try white snowflakes on red cake pops, gold pearls on green ones, or colorful Christmas sprinkles on both.
Work with one cake pop at a time so the coating doesn’t harden before you finish decorating.
Step 8: Let Them Set
Place the decorated cake pops upright in a cake pop stand or sturdy food-safe foam block.
Allow the coating to harden completely before serving or packaging.
Tips for Perfect Homemade Cake Pops
Don’t add too much frosting. Too much can make the cake balls heavy and difficult to keep on the sticks.
Cool the cake completely. Warm cake can make the frosting mixture overly soft.
Make evenly sized balls. Similar-sized cake pops are easier to dip and look more attractive together.
Secure the sticks first. Dipping each stick in melted coating helps hold the cake ball in place.
Avoid frozen-solid centers. Very cold cake balls dipped into warm coating may develop cracks as the temperatures change.
Decorate immediately. Add sprinkles while the coating is wet so they stick properly.
Christmas Cake Pop Decorating Ideas
One of the best things about this recipe is how many different designs you can make.
Classic Red and Green: Dip half the cake pops in each color and decorate with contrasting sprinkles.
Christmas Holly: Add small edible holly leaves and red candy berries to green-coated cake pops.
Snowflake Cake Pops: Decorate red cake pops with white snowflake sprinkles.
Gold and Green: Use green candy melts with edible gold sugar pearls for an elegant holiday look.
Christmas Sprinkle Mix: Cover the tops with red, green, and white nonpareils for a colorful finish.
You can make every cake pop different or choose one design for a matching holiday dessert display.
How to Store Christmas Cake Pops
Store finished cake pops in an airtight container in the refrigerator for up to 5 days for best quality.
If you need to stack them, separate the layers with parchment paper to protect the decorations.
You can also freeze undecorated cake balls for up to 2 months. Thaw them in the refrigerator until firm but no longer frozen solid before dipping.
For parties, keep the cake pops away from direct sunlight and warm areas. Refrigeration is recommended, especially when using frosting that requires chilling.
Frequently Asked Questions
Can I make Christmas cake pops with boxed cake mix?
Yes! Bake your favorite boxed cake mix according to the package directions. Let the cake cool completely before crumbling it and mixing with frosting.
Why are my cake pops falling off the sticks?
The cake mixture may be too soft, the balls may be too large, or the sticks may not be secured properly. Use smaller portions and attach the sticks with melted candy coating.
Why is my candy coating cracking?
Cracks can develop when very cold cake balls are dipped into warm coating. Avoid dipping the centers while they’re frozen solid.
Can I make Christmas cake pops ahead of time?
Absolutely. Prepare the cake balls a day ahead, refrigerate them, and dip and decorate them when you’re ready.
Do I need a cake pop stand?
A cake pop stand makes decorating easier, but you can also use a stable food-safe foam block to hold the sticks upright while the coating sets.
A Sweet Treat for the Holidays
These Christmas Cake Pops are a simple way to make your holiday dessert table feel extra special. The soft cake centers, colorful candy coating, and cheerful decorations make them a favorite for parties and homemade gifts.
Whether you choose classic red and green, sparkling gold sprinkles, or tiny edible holly decorations, they’re a fun Christmas treat to make and share.
Easy Christmas Cake Pops
Ingredients
Method
- Crumble the completely cooled cake into fine crumbs in a large bowl.
- Gradually mix in vanilla frosting until the crumbs hold together when pressed.
- Roll the mixture into approximately 24 balls, about 1½ inches wide.
- Place on a parchment-lined baking sheet and refrigerate for 30 minutes.
- Melt a small amount of candy coating. Dip one end of each lollipop stick into the coating and insert halfway into a cake ball.
- Refrigerate for approximately 30 minutes, until the sticks are secure.
- Melt the remaining red and green candy melts separately, stirring until smooth.
- Dip each cake pop into the melted coating, allowing the excess to drip off.
- Immediately decorate with Christmas sprinkles or edible holly.
- Place upright in a cake pop stand and let the coating set completely.