Old-Fashioned Stained Glass Window Candy (No-Bake)
Old-Fashioned Stained Glass Window Candy (No-Bake Christmas Recipe)
Some Christmas treats have a way of taking you right back to Grandma’s kitchen. For me, old-fashioned stained glass window candy is one of those recipes that looks like it belongs on every Christmas candy tray.
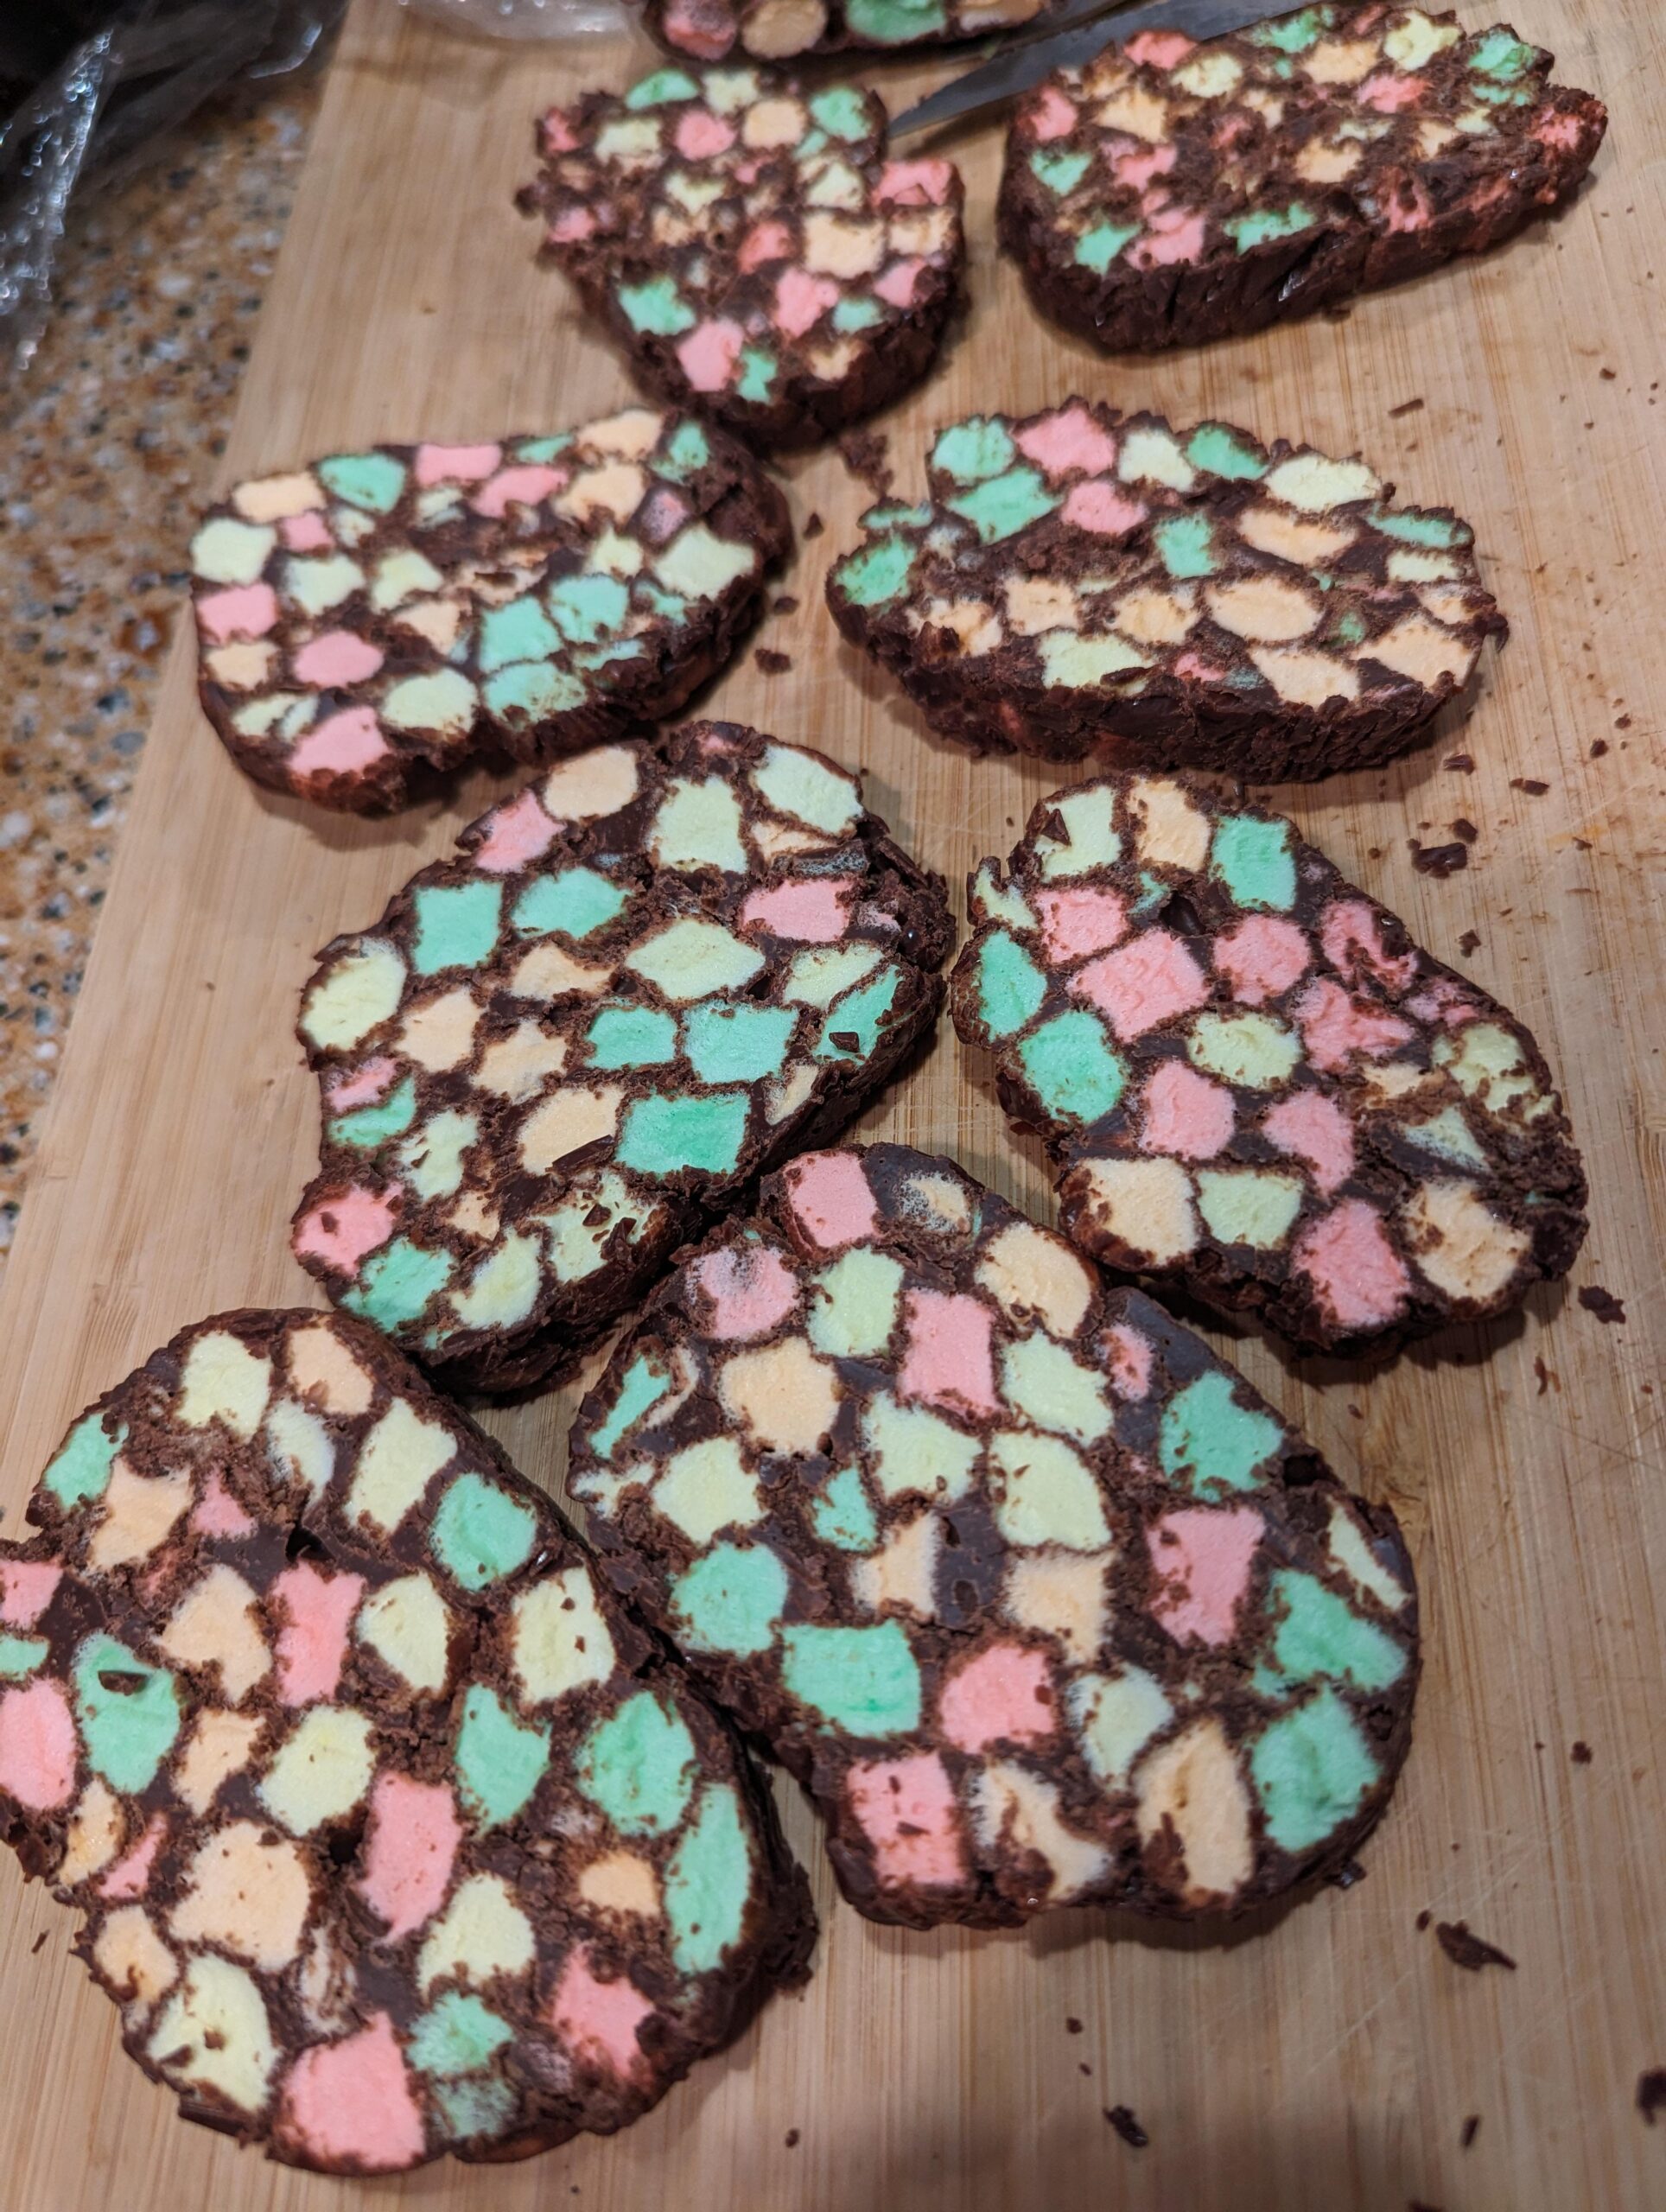
Those colorful little slices, filled with pastel marshmallows and surrounded by rich chocolate, always stood out among the homemade fudge, peanut brittle, and Christmas cookies.
Some families called them Church Window Cookies, while others knew them as Cathedral Window Candy. Whatever name you remember, they’re the same beautiful old-fashioned treat that has been showing up at holiday gatherings for generations.
And here’s the wonderful part: you don’t even need to turn on your oven.
This easy no-bake Christmas candy is made with chocolate, butter, colorful mini marshmallows, and a little coconut. Once everything is rolled into logs and chilled, each slice reveals a pretty stained glass pattern.
It’s simple, nostalgic, and perfect for making ahead during the busy Christmas season.
Why You’ll Love This Old-Fashioned Christmas Candy
There’s a reason this recipe has remained a holiday favorite for so many years.
- No baking required: You don’t need an oven or candy thermometer.
- Only five main ingredients: Everything is easy to find at the grocery store.
- Beautiful Christmas colors: Pastel marshmallows create the stained glass effect.
- Perfect for making ahead: Prepare the logs the day before serving.
- Great for holiday gifting: The colorful slices look lovely in Christmas candy boxes.
- A nostalgic family favorite: Just like the treats Grandma used to put on her Christmas dessert tray.
What Is Stained Glass Window Candy?
Stained glass window candy is an old-fashioned American no-bake dessert made by coating colorful mini marshmallows in melted chocolate and shaping the mixture into logs.
After chilling, the logs are sliced into rounds.
The dark chocolate surrounds the pastel marshmallows, creating a pattern that resembles colorful stained glass windows.
Many traditional recipes also include shredded coconut around the outside, giving each slice a snowy white border.
This candy is sometimes called Church Window Cookies or Cathedral Window Cookies, even though it’s technically a no-bake confection rather than a baked cookie.
Ingredients You’ll Need
You only need a handful of simple ingredients to make this Christmas classic.
Semisweet Chocolate Chips — 2 Cups (12 Ounces)
Semisweet chocolate creates the rich chocolate coating that holds the marshmallows together.
Its slightly bittersweet flavor helps balance the sweetness of the candy.
Unsalted Butter — ½ Cup (1 Stick)
Butter helps create a smooth chocolate mixture that becomes firm after chilling.
Vanilla Extract — 1 Teaspoon
A little vanilla adds warmth and rounds out the chocolate flavor.
Pastel Mini Marshmallows — 1 Bag (10 Ounces)
These are the most important ingredient for the stained glass appearance.
Look for mini marshmallows in pastel pink, yellow, green, and orange.
Regular white marshmallows will work, but they won’t create the same colorful effect.
Sweetened Shredded Coconut — 1 Cup
Coconut coats the outside of the candy logs and gives them their traditional snowy appearance.
If your family doesn’t like coconut, you can leave it out.
How to Make Old-Fashioned Stained Glass Window Candy
This recipe is easy to prepare, but there is one important secret: let the chocolate cool before adding the marshmallows.
Step 1: Prepare the Wax Paper
Lay two large sheets of wax paper or parchment paper on your countertop, approximately 16 inches long.
Sprinkle ½ cup of shredded coconut down the center of each sheet.
This will help coat the outside of the candy logs.
Step 2: Melt the Chocolate and Butter
Place the semisweet chocolate chips and butter in a medium microwave-safe bowl.
Microwave at 50% power in 20-second intervals, stirring thoroughly after each interval.
Continue until the chocolate is smooth and completely melted.
You can also melt everything gently in a heatproof bowl over a saucepan of barely simmering water.
Remove from the heat and stir in the vanilla extract.
Step 3: Cool the Chocolate
Let the melted chocolate mixture cool for approximately 10–15 minutes, stirring occasionally.
It should remain smooth and spreadable but no longer feel hot.
This step matters because hot chocolate can partially melt the marshmallows and ruin their colorful appearance.
Step 4: Add the Marshmallows
Place the pastel mini marshmallows in a large mixing bowl.
Pour the cooled chocolate mixture over them.
Using a spatula, gently fold everything together until the marshmallows are evenly coated.
Try not to crush them.
You want the colorful marshmallows to remain whole so they’ll look beautiful when sliced.
Step 5: Divide the Mixture
Divide the chocolate marshmallow mixture into two equal portions.
Spoon each portion onto one of the prepared sheets of wax paper, directly over the coconut.
Arrange each portion into a rough log.
Step 6: Shape the Candy Logs
Use the wax paper to gently roll each portion into a log approximately 2 inches thick.
Press just enough to compact the marshmallows without crushing them.
Roll the logs through the shredded coconut so the outside is evenly coated.
Wrap tightly in the wax paper and twist the ends to help maintain the shape.
Step 7: Refrigerate
Place the wrapped candy logs in the refrigerator for at least 3 hours, or until completely firm.
For the cleanest slices, refrigerate overnight.
Step 8: Slice the Candy
Unwrap one chilled log and place it on a cutting board.
Using a sharp knife, slice it into rounds approximately ½ inch thick.
Each slice should reveal colorful marshmallows surrounded by rich chocolate.
Repeat with the second log.
Step 9: Serve
Arrange the candy slices on a Christmas serving plate or decorative holiday tray.
Keep refrigerated until shortly before serving for the best texture.
Grandma’s Tips for Perfect Stained Glass Candy
Let the chocolate cool. This is the most important step. Chocolate that’s too hot can melt the marshmallows.
Use pastel marshmallows. Their colors create the classic stained glass pattern.
Don’t overmix. Fold gently so the marshmallows keep their shape.
Shape the logs tightly. This helps prevent the candy from falling apart when sliced.
Chill overnight if possible. Firm logs are much easier to cut neatly.
Use a sharp knife. Wipe the blade between slices if chocolate starts sticking.
Keep the candy cool. Warm temperatures can soften the chocolate.
Easy Stained Glass Candy Variations
Church Window Cookies Without Coconut
Not everyone likes coconut, and that’s perfectly fine.
Simply skip the shredded coconut and roll the chocolate marshmallow mixture tightly in wax paper.
Chocolate Walnut Stained Glass Candy
Add ½ cup finely chopped walnuts to the chocolate marshmallow mixture for extra crunch.
Milk Chocolate Version
Replace semisweet chocolate chips with milk chocolate chips for a sweeter flavor.
Dark Chocolate Version
Use dark chocolate chips for a richer chocolate taste that balances the sweet marshmallows.
Christmas Red and Green Version
If you can find red and green mini marshmallows, use them to create a festive Christmas color combination.
How to Store Stained Glass Window Candy
One of the best things about this recipe is how well it works for preparing ahead.
Refrigerator: Store the sliced candy in an airtight container for up to 1 week. Place parchment paper between layers to prevent sticking.
Freezer: Freeze wrapped logs or individual slices in a freezer-safe container for up to 2 months.
Thawing: Thaw frozen candy overnight in the refrigerator.
Make Ahead: Prepare the logs 1–2 days before Christmas and slice them when you’re ready to arrange your candy tray.
For the best texture, store this chocolate marshmallow candy in the refrigerator rather than leaving it in a warm kitchen.
Frequently Asked Questions
Why Is It Called Stained Glass Window Candy?
The colorful marshmallows resemble pieces of stained glass when the chocolate logs are sliced.
The dark chocolate surrounding the marshmallows looks like the borders of little church windows.
Are Church Window Cookies and Stained Glass Candy the Same Thing?
Yes. These names are commonly used interchangeably.
Some families also call the recipe Cathedral Window Candy.
Can I Make This Candy Without Coconut?
Absolutely. Coconut is optional and can be omitted without changing the chocolate marshmallow mixture.
Why Did My Marshmallows Melt?
The chocolate was probably too warm when you mixed everything together.
Allow it to cool until just slightly warm before adding the marshmallows.
Can I Use White Mini Marshmallows?
Yes, but the finished candy won’t have the same colorful stained glass appearance.
Can I Make Stained Glass Candy Ahead of Christmas?
Yes! This is an excellent make-ahead holiday recipe because the logs need several hours to chill.
You can prepare them the day before and slice them just before serving.
A Sweet Old-Fashioned Christmas Memory
Some Christmas recipes are remembered for their flavor, and others are remembered for how beautiful they looked on Grandma’s candy tray.
Stained glass window candy is one of those treats that manages to be both.
The colorful marshmallows, rich chocolate, and snowy coconut coating make every slice look special.
And sometimes, seeing a familiar Christmas candy is all it takes to bring back memories of the people who used to make it.
Whether you’re continuing an old family tradition or trying this recipe for the first time, these little chocolate marshmallow slices are a lovely addition to your holiday baking collection.
Do you remember these from childhood? Did your family call them Stained Glass Window Candy, Church Window Cookies, or Cathedral Window Cookies?
Old-Fashioned Stained Glass Window Candy
Ingredients
Method
- Lay two sheets of wax paper or parchment paper on the counter, each approximately 16 inches long.
- Sprinkle ½ cup shredded coconut down the center of each sheet.
- Place the chocolate chips and butter in a microwave-safe bowl.
- Microwave at 50% power in 20-second intervals, stirring between intervals until smooth.
- Stir in the vanilla extract.
- Allow the chocolate mixture to cool for approximately 10–15 minutes, until no longer hot.
- Place the pastel mini marshmallows in a large bowl.
- Pour the cooled chocolate mixture over the marshmallows and gently fold until evenly coated.
- Divide the mixture into two equal portions and spoon onto the prepared coconut-covered sheets.
- Shape each portion into a log approximately 2 inches thick.
- Roll the logs through the coconut and wrap tightly in wax paper.
- Refrigerate for at least 3 hours or overnight until firm.
- Unwrap and slice into approximately ½-inch rounds.
- Arrange on a serving plate and keep chilled until ready to serve.
Notes
Pastel mini marshmallows create the traditional stained glass appearance.
Coconut may be omitted if preferred.
Refrigerate overnight for cleaner slices.
Store in an airtight container in the refrigerator for up to 1 week.
Freeze for up to 2 months.
Yield varies depending on log length and slice thickness.