Grandma’s Classic Peanut Butter Balls (No-Bake Recipe)
Grandma’s Classic Peanut Butter Balls (Old-Fashioned No-Bake Christmas Candy)
There’s something about Christmas that brings back memories of Grandma’s kitchen. The smell of homemade cookies, the sound of Christmas music playing in the background, and those little plates filled with homemade candies waiting on the counter.
And if you grew up with Grandma’s Classic Peanut Butter Balls, you know exactly how special those little chocolate-covered treats were.
Every holiday season, these sweet peanut butter candies seemed to appear on Christmas dessert trays, tucked between sugar cookies, homemade fudge, and colorful Christmas candies.
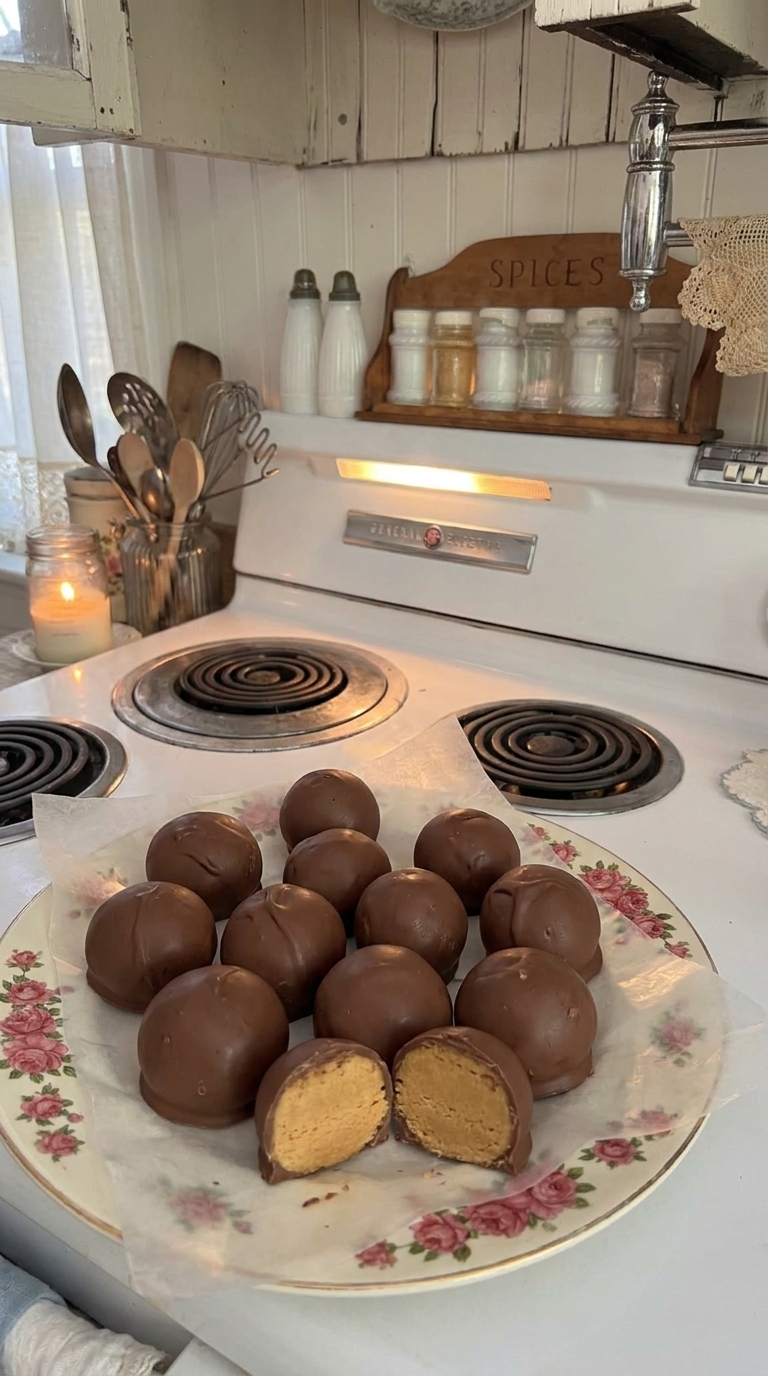
With their creamy peanut butter centers and rich chocolate coating, they were always one of the first treats to disappear.
The wonderful thing about this old-fashioned recipe is how simple it is. You don’t need an oven, complicated equipment, or fancy ingredients. Just a handful of pantry staples and a little time in the refrigerator.
Whether you’re making them for Christmas, sharing them with neighbors, or introducing your children to a favorite family tradition, these homemade peanut butter balls are a sweet reminder of simpler times.
Why You’ll Love These Peanut Butter Balls
There are plenty of reasons this classic Christmas candy has remained popular for generations.
- No baking required: Everything comes together without turning on the oven.
- Simple ingredients: Peanut butter, butter, powdered sugar, vanilla, and chocolate.
- Perfect for Christmas: They look beautiful on homemade holiday candy trays.
- Make-ahead friendly: Prepare them several days before your celebration.
- Great for gifting: Pack them into festive tins or treat boxes.
- Rich and creamy: Every bite combines sweet peanut butter with a smooth chocolate shell.
What Are Old-Fashioned Peanut Butter Balls?
Peanut butter balls are a traditional American homemade candy made from a sweet peanut butter mixture rolled into small balls and dipped in melted chocolate.
They’re similar to Buckeye candies, but there’s one important difference.
Buckeyes are traditionally dipped only partway into chocolate, leaving a small circle of peanut butter visible on top.
Classic chocolate-covered peanut butter balls are completely coated, creating a smooth chocolate shell around the filling.
They’re especially popular during Christmas because they’re easy to prepare in large batches and store beautifully.
Ingredients You’ll Need
For the Peanut Butter Filling
- 1 cup creamy peanut butter
- ½ cup unsalted butter, softened
- 3 cups powdered sugar, sifted
- 1 teaspoon vanilla extract
- ¼ teaspoon salt, optional
For the Chocolate Coating
- 2 cups semisweet chocolate chips
- 1 tablespoon coconut oil or vegetable shortening, optional
Ingredient tip: Use regular creamy peanut butter for the most consistent texture. Natural peanut butter that separates can make the filling too soft or oily.
How to Make Grandma’s Classic Peanut Butter Balls
Step 1: Cream the Peanut Butter and Butter
In a large mixing bowl, combine the creamy peanut butter and softened butter.
Beat with an electric mixer until smooth and creamy.
Add the vanilla extract and optional salt.
Step 2: Add the Powdered Sugar
Gradually add the powdered sugar, one cup at a time.
Mix until a thick, soft dough forms.
The mixture should hold together when pressed between your fingers without feeling overly sticky.
Step 3: Roll Into Balls
Scoop approximately 1 tablespoon of the peanut butter mixture.
Roll it between your palms to form a smooth ball.
Place each ball on a parchment-lined baking sheet.
Continue until all the mixture is used.
Step 4: Chill the Peanut Butter Balls
Refrigerate the prepared balls for approximately 30–45 minutes.
Chilling helps them maintain their shape when dipped into warm chocolate.
Step 5: Melt the Chocolate
Place the chocolate chips and optional coconut oil in a microwave-safe bowl.
Microwave in 20–30-second intervals, stirring between each interval, until smooth.
Avoid overheating the chocolate.
Step 6: Dip in Chocolate
Using a fork or dipping tool, lower each chilled peanut butter ball into the melted chocolate.
Turn gently until completely coated.
Lift it out and allow excess chocolate to drip back into the bowl.
Return the coated candy to the parchment-lined baking sheet.
Step 7: Let the Chocolate Set
Refrigerate the chocolate-covered peanut butter balls for approximately 20–30 minutes, until the coating becomes firm.
Once set, transfer them to an airtight container or arrange them on a festive Christmas plate.
Tips for Perfect Peanut Butter Balls
Use creamy peanut butter. Regular creamy peanut butter creates a smooth filling that holds together well.
Soften, don’t melt, the butter. Softened butter blends easily without making the filling runny.
Add powdered sugar gradually. This helps prevent lumps and makes mixing easier.
Chill before dipping. Cold peanut butter balls are easier to coat.
Melt chocolate slowly. Overheated chocolate can become thick or grainy.
Use parchment paper. It prevents the chocolate coating from sticking while setting.
Easy Peanut Butter Ball Variations
You can customize this traditional recipe with a few simple changes.
Crunchy Peanut Butter Balls: Replace creamy peanut butter with crunchy peanut butter.
White Chocolate Peanut Butter Balls: Use melted white chocolate instead of semisweet chocolate.
Christmas Sprinkle Peanut Butter Balls: Add red and green sprinkles before the chocolate hardens.
Dark Chocolate Peanut Butter Balls: Use dark chocolate for a less sweet coating.
Peanut Butter Balls With Graham Crackers: Replace a small portion of the powdered sugar with finely crushed graham crackers for a slightly different texture.
How to Store Homemade Peanut Butter Balls
Refrigerator: Store in an airtight container for up to 2 weeks.
Freezer: Freeze in a freezer-safe container for up to 3 months.
Place parchment paper between layers to prevent sticking.
For the best texture, allow refrigerated candies to sit at room temperature for a few minutes before serving.
Frequently Asked Questions
Can I make peanut butter balls ahead of Christmas?
Absolutely! These candies are ideal for preparing several days ahead. Keep them refrigerated until you’re ready to serve.
Why is my peanut butter filling too sticky?
The mixture may be too warm or contain too little powdered sugar. Refrigerate briefly or add a small amount of powdered sugar.
Can I use natural peanut butter?
You can, but the texture may vary. A well-stirred, no-separation peanut butter works best.
Do peanut butter balls need refrigeration?
Refrigeration is recommended to keep the chocolate firm and maintain the best texture.
Can I make these without an electric mixer?
Yes. A sturdy wooden spoon works, although the filling becomes quite thick as the powdered sugar is added.
Final Thoughts
Grandma’s Classic Peanut Butter Balls are more than just an easy Christmas candy. They’re the kind of homemade treat that brings back memories of family gatherings, holiday baking, and childhood Christmas celebrations.
With their creamy peanut butter centers and rich chocolate shells, they’re simple enough for beginners and special enough to become a yearly tradition.
Make a batch, arrange them on your favorite holiday plate, and share a little old-fashioned Christmas sweetness with the people you love.