Extra Crispy Buttermilk Fried Chicken (Easy Recipe)
Extra Crispy Buttermilk Fried Chicken
The Secret to the Ultimate Crunch
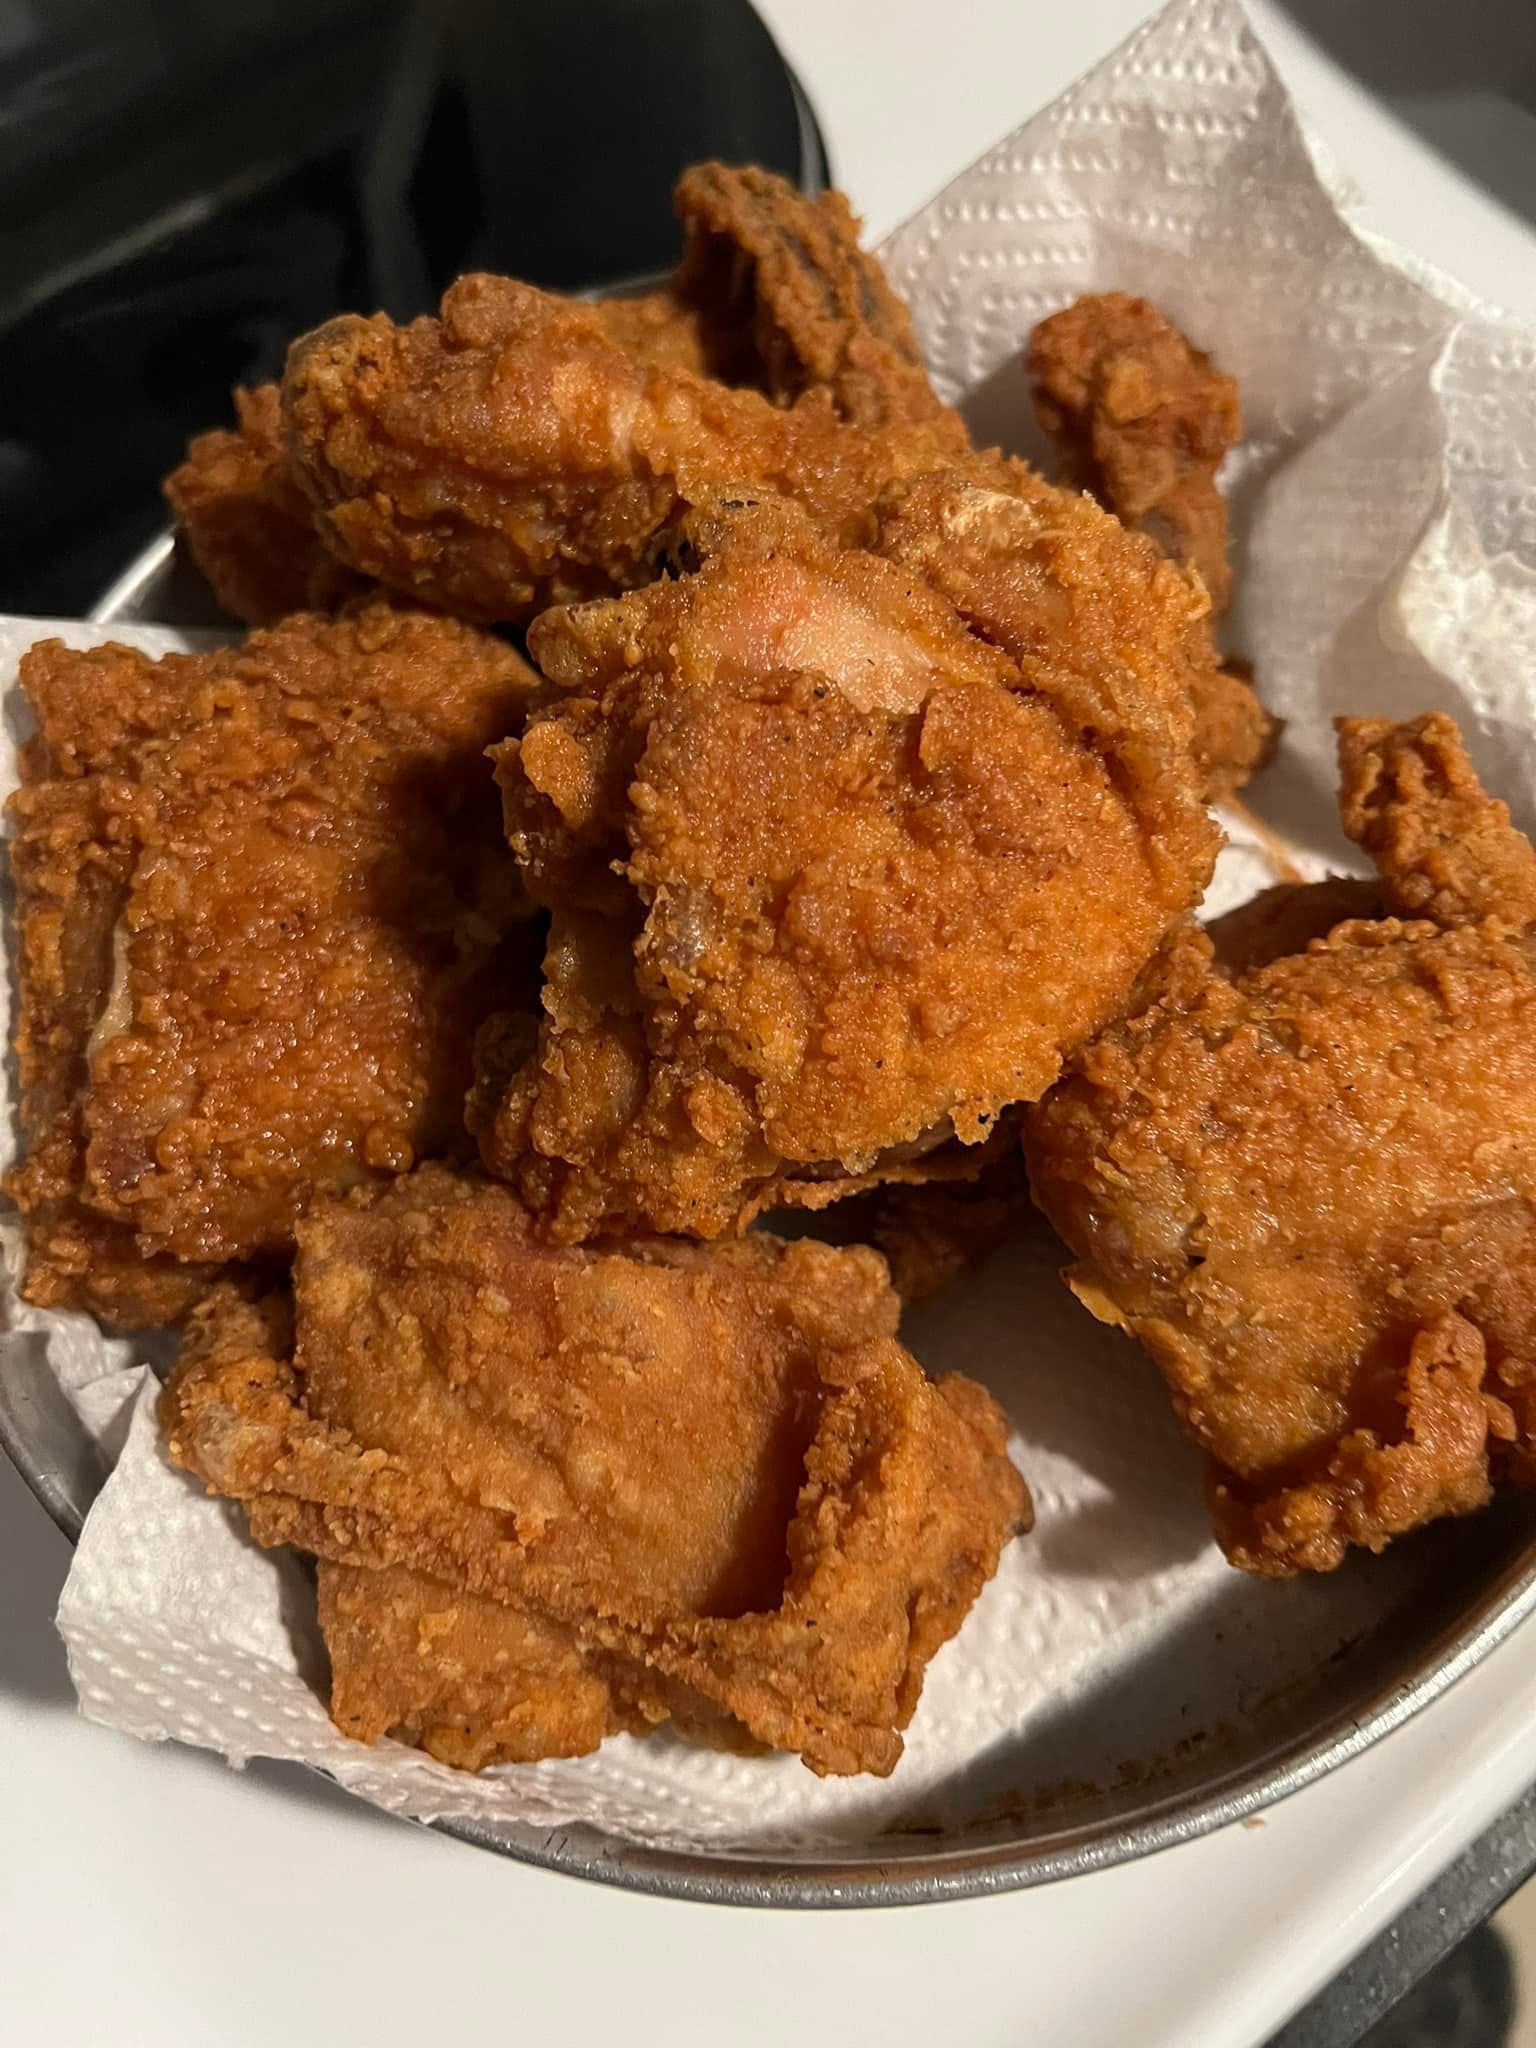
There are few things in the culinary world more deeply satisfying than biting into a piece of perfectly executed crispy fried chicken. Achieving that thick, craggy, golden-brown crust at home might seem intimidating, but it is entirely possible with a few simple techniques. This recipe focuses on maximizing that signature crunch while ensuring the meat inside stays incredibly juicy and flavorful.
The foundation of great fried chicken is a tangy buttermilk marinade. Soaking the chicken in seasoned buttermilk not only injects flavor right down to the bone but also gently tenderizes the meat. The real magic, however, happens in the breading station. By adding a touch of cornstarch to the seasoned flour, you create a lighter, crispier coating that shatters perfectly when you bite into it.
Whether you are hosting a summer picnic, preparing a traditional Sunday dinner, or simply craving classic comfort food, this crispy fried chicken delivers every single time. It relies on standard pantry spices to build a robust flavor profile that tastes just like your favorite Southern diner. Once you hear that aggressive sizzle in the pan and see that beautiful golden crust form, you will never want to rely on a drive-thru for fried chicken again.
Why You’ll Love This Recipe
-
Unbeatable Crunch: The combination of all-purpose flour and cornstarch guarantees an incredibly crispy, craggy exterior that stays crunchy long after it leaves the oil.
-
Juicy and Tender: An overnight buttermilk soak breaks down the proteins, ensuring the meat is never dry or tough.
-
Perfectly Seasoned: The robust spice blend is mixed into both the marinade and the flour, building deep, savory flavor in every layer.
-
Foolproof Method: Simple, step-by-step instructions take the guesswork out of deep-frying at home.
-
Classic Comfort Food: This is the quintessential, nostalgia-inducing dinner that appeals to kids and adults alike.
Ingredients
-
Chicken: 1 whole chicken (cut into 8 pieces), or about 3-4 pounds of bone-in, skin-on chicken thighs and drumsticks.
-
Buttermilk: 2 cups of whole buttermilk (for the tenderizing marinade).
-
Hot Sauce: 2 tablespoons (optional, adds flavor rather than intense heat).
-
All-Purpose Flour: 2 cups (the base of the breading).
-
Cornstarch: ½ cup. This is the secret ingredient for a shatteringly crisp crust.
-
Frying Oil: Peanut oil, canola oil, or vegetable oil (enough to fill a heavy pot or Dutch oven halfway).
-
Spices (Divide equally between the marinade and the flour):
-
2 tablespoons Kosher salt
-
1 tablespoon black pepper
-
1 tablespoon garlic powder
-
1 tablespoon onion powder
-
1 tablespoon smoked paprika
-
1 teaspoon cayenne pepper (adjust for spice preference)
-
Step-by-Step Instructions
Step 1: The Buttermilk Marinade
In a large mixing bowl, whisk together the buttermilk, hot sauce, and half of your spice mixture (salt, pepper, garlic powder, onion powder, paprika, and cayenne). Submerge your chicken pieces completely in the liquid. Cover the bowl with plastic wrap and refrigerate for at least 4 hours, or ideally overnight.
Step 2: Prepare the Seasoned Flour
When you are ready to fry, set up your dredging station. In a large, wide dish, whisk together the all-purpose flour, cornstarch, and the remaining half of your spice mixture. Make sure the spices are evenly distributed throughout the flour.
Step 3: Create the Craggy Bits
Take about 3 tablespoons of the buttermilk marinade straight from the chicken bowl and drizzle it directly into the seasoned flour. Use a fork or your fingers to toss the flour around, creating little clumps. These clumps will stick to the chicken and turn into those coveted, extra-crunchy craggy bits when fried.
Step 4: Dredge the Chicken
Remove a piece of chicken from the buttermilk, letting the excess drip off for just a second. Drop it into the seasoned flour mixture. Toss it thoroughly, pressing the flour firmly into all the crevices of the skin. Shake off any loose flour and place the breaded chicken on a wire rack to rest for 10 minutes while you heat the oil.
Step 5: Heat the Oil
Fill a heavy-bottomed Dutch oven or cast-iron skillet with about 2 to 3 inches of frying oil. Heat the oil over medium-high heat until it reaches 350°F (175°C) on a deep-fry thermometer.
Step 6: Fry to Golden Perfection
Carefully lower the breaded chicken pieces into the hot oil, working in batches to avoid overcrowding the pan. Fry the chicken for 12 to 15 minutes, turning occasionally, until the crust is a deep golden brown and the internal temperature of the thickest piece reaches 165°F (74°C).
Step 7: Drain and Rest
Use tongs or a spider skimmer to carefully remove the crispy fried chicken from the oil. Transfer the pieces to a plate lined with paper towels (or a clean wire rack set over a baking sheet) to drain the excess oil. Let the chicken rest for at least 5 minutes before serving so the juices can redistribute.
Expert Cooking Tips
-
Rest the Breading: Letting the breaded chicken sit on a wire rack for 10 minutes before frying allows the flour to hydrate and adhere to the skin. This prevents the crust from falling off in the hot oil.
-
Monitor the Temperature: Maintaining a consistent oil temperature of 325°F to 350°F is critical. If it gets too hot, the crust will burn before the meat cooks. If it drops too low, the chicken will absorb the oil and become greasy.
-
Do Not Overcrowd: Frying too many pieces at once rapidly drops the oil temperature. Fry in batches of 3 or 4 pieces for the best, crispiest results.
-
Use Dark Meat: Bone-in, skin-on chicken thighs and drumsticks are highly recommended. They are much more forgiving than breasts and stay incredibly juicy during the frying process.
-
The Cornstarch Trick: Never skip the cornstarch. It prevents gluten development in the flour coating, which results in a lighter, crispier crust that absorbs less oil.
Variations to Try
-
Nashville Hot Style: Whisk a ladle of the hot frying oil into a bowl with cayenne pepper, brown sugar, paprika, and garlic powder. Brush this spicy oil over the chicken immediately after frying.
-
Herb Roasted Crust: Mix a tablespoon of dried thyme, rosemary, and oregano into the flour dredge for a savory, herbaceous flavor profile.
-
Gluten-Free Crunch: Swap the all-purpose flour for a high-quality gluten-free 1-to-1 baking flour blend to achieve a similarly crispy crust without the gluten.
What to Serve With Crispy Fried Chicken
This classic main course deserves traditional, comforting side dishes. Serve your golden fried chicken alongside a large bowl of creamy, custard-style baked macaroni and cheese and fluffy buttermilk biscuits. To cut through the richness of the fried crust, add a side of tangy, vinegar-based coleslaw or quick-skillet green beans.
Storage & Reheating
Refrigerator
Allow the fried chicken to cool completely to room temperature. Store it in an airtight container lined with a dry paper towel in the refrigerator for up to 4 days.
Freezer
You can freeze leftover fried chicken for up to 3 months. Wrap each piece individually in aluminum foil, then place them all into a heavy-duty freezer bag. Thaw overnight in the refrigerator before reheating.
Reheating
Never use the microwave if you want to keep the crust crispy! To reheat, place the chicken on a wire rack set over a baking sheet. Bake in a preheated 400°F (200°C) oven for 15 to 20 minutes, or until the meat is heated through and the skin is re-crisped.
Frequently Asked Questions
Why is my fried chicken breading falling off?
Breading usually falls off if the chicken was not patted dry before the buttermilk soak, or if you didn’t let the breaded chicken rest before frying. That 10-minute resting period is crucial for the flour to bond to the skin.
How do I know when the chicken is done?
The most reliable way to check for doneness is using a digital meat thermometer. The thickest part of the chicken (avoiding the bone) must register at least 165°F (74°C). The juices should also run perfectly clear.
Can I reuse the frying oil?
Yes! Once the oil has completely cooled, strain it through a fine-mesh sieve lined with cheesecloth or a coffee filter to remove all the leftover flour and chicken bits. Store the clean oil in a dark, cool place and reuse it once or twice more.
What is the best oil for frying chicken?
You need an oil with a high smoke point and a neutral flavor. Peanut oil is the traditional favorite for Southern fried chicken, but canola oil or standard vegetable oil both work exceptionally well.
Can I make this in an air fryer?
While deep frying yields the best, most traditional results, you can air fry this recipe. Spray the breaded chicken generously with cooking spray (to simulate the oil) and air fry at 380°F for about 25 minutes, flipping halfway through, until golden and cooked.
Final Thoughts
Making extra crispy fried chicken at home is a labor of love that pays off in a major way. By taking the time to let the chicken soak in buttermilk and utilizing the cornstarch trick in your flour dredge, you guarantee a shatteringly crisp crust every single time. It is the ultimate comfort food experience that will have your family and friends begging for the recipe. Heat up that oil and enjoy!
Extra Crispy Buttermilk Fried Chicken
The ultimate Southern-style fried chicken featuring an incredibly crunchy, craggy crust and juicy, buttermilk-tenderized meat.
Ingredients
Equipment
Method
- Marinate: In a large bowl, whisk together the buttermilk, hot sauce, and half of all the spices. Add the chicken, cover, and refrigerate for at least 4 hours (overnight is best).
- Prep Flour: In a wide dish, whisk the all-purpose flour, cornstarch, and the remaining half of the spices.
- Make Craggy Bits: Drizzle 3 tablespoons of the buttermilk marinade from the chicken bowl into the flour. Toss with your fingers to create small clumps.
- Dredge: Remove a piece of chicken from the buttermilk, letting excess drip off. Press it firmly into the flour mixture to coat completely.
- Rest: Place the breaded chicken on a wire rack and let it rest for 10 minutes.
- Heat Oil: Heat 2-3 inches of oil in a heavy pot to 350°F (175°C).
- Fry: Working in batches, carefully lower chicken into the oil. Fry for 12-15 minutes, turning occasionally, until deep golden brown and the internal temperature reaches 165°F (74°C).
- Drain: Transfer the fried chicken to a plate lined with paper towels or a clean wire rack. Let rest for 5 minutes before serving.
Notes
Temperature Control: Do not overcrowd the pan, or the oil temperature will drop and the crust will become greasy. Adjust heat to maintain roughly 325°F while frying.
Resting the Breading: Letting the breaded raw chicken sit for 10 minutes is the secret to keeping the crust attached during frying.